
SQUAREBIRDS POWER WINDOW GLASS REPLACEMENT TIP
Here are two pictures from the 1958 Ford Service Forum #4 and two from the 1959 Thunderbird Shop Manual that might help you better understand the instructions being provided below. I want to thank Richard D. Hord for writing this up for us. It should be very helpful to others who need to replace their broken door windows.
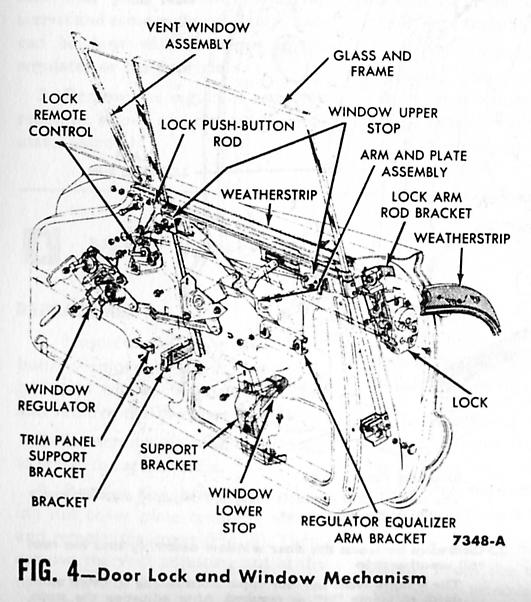
CHANGING OUT POWER WINDOW DOOR GLASS
Take a magic marker and mark TOP on door glass.
Remove the door lock by unscrewing it.
Remove the stainless steel trim.
Remove the door handle. The door handle is held in place by a hair pin retaining clip. I pushed the door panel back where I could see it and took a long slotted screwdriver and pushed the clip until it popped off. The door handle should now slide off and the spacer also.
Remove the arm rest. It is held in place by screws.
Remove the door panel. I took a putty knife and slid it in between the door and door panel. Twist it gently and the clips should pop loose.
Remove the water barrier.
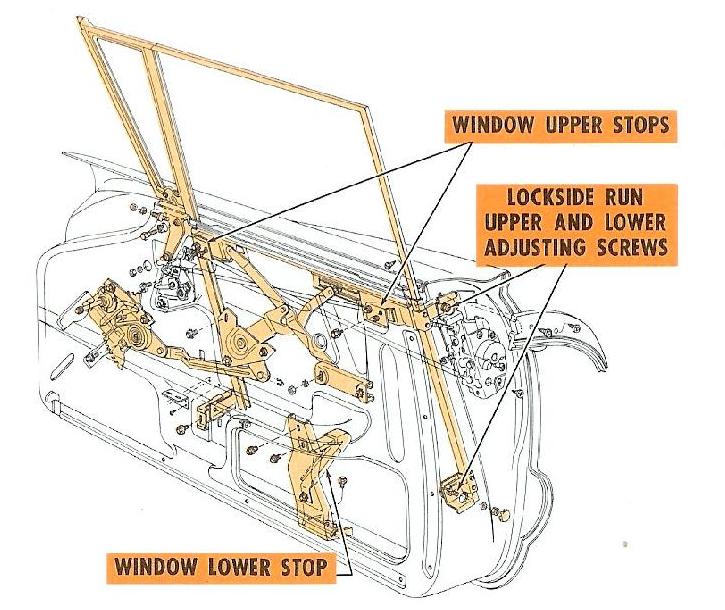
There are two window stops at the top of the door that are held in place by two bolts each. Remove these. Also there is a window stop at the bottom of the door held in place by three bolts, one on the face of the door and two under the bottom of the door. Remove these.
Remove the guide roller assembly, which is about three quarters back from the front of the door and about half way between the top and the bottom of the door. It is held in place by two nuts. Remove the nuts and reach up inside door and remove the guide. Remove the two nuts that hold motor onto window regulator. I left the motor lying in the bottom of door.
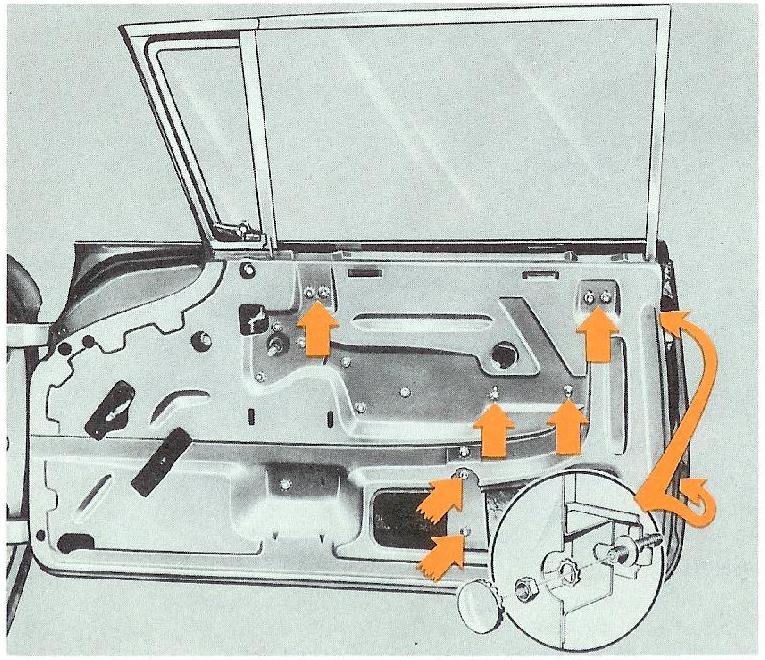
In the center of the door there are three bolts, close to where the arm rest screw fastened. Remove these. There is a indention down below. Remove that bolt also. The window regulator should now be loose.
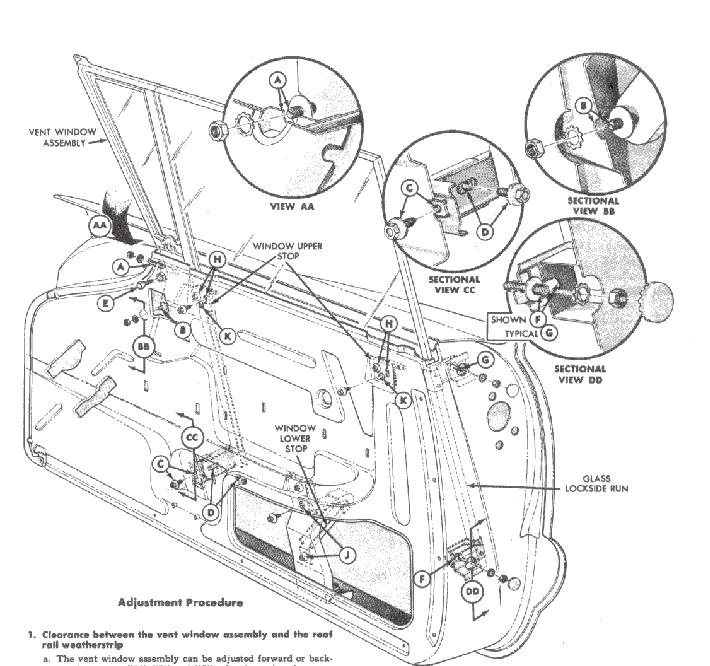
There are three adjustment screws on the window glass assembly. Loosen these.
Remove the bolt right below the window glass. Now it should move freely.
Grab the window glass and pull up. You will have to work it to get the back of the glass and stainless steel trim up so you can see two small screws that hold the stainless trim and window regulator together. Remove these two screws.
This is where you may need some help. You need to wiggle the glass and hold the window regulator down all at the same time. The glass should come out of the window regulator channel.
Now that you have the glass out it is time to remove the stainless steel trim. I got a hammer and small block of wood. I had my wife hold the glass. Lay the block of wood against glass and against stainless steel trim and gently peck. Work this as one unit, move around and break it loose. Remember this corner on this stainless is welded and if care is not taken it will break.
I then took the glass and made a pattern on cardboard and cut it out. I had a glass supplier get me a sample piece of 1/4" Solex. You can tell what color your glass is by holding a white piece of paper behind it. After I determined it was green glass, I gave him the pattern and had him order me a piece of 1/4" Solex tempered glass per my pattern. No labels and no tong marks. It cost me $26.00 dollars for the piece of glass! I decided to go with tempered glass, as it is safety glass like in newer cars, and unlike laminated it will not delaminate over time.
I decided I wanted to take out the window regulator and grease it. It will come out of the large hole at the bottom of the door. I greased the rollers, gear assembly and the tracks. I also sprayed silicone on the window guides.
Reinstalling.
After you receive the new glass, determine which is the top and mark it. Laying your old glass on the new glass is the best way to do this. I got the glass supplier to sell me some glass tape to reinstall the glass into the stainless steel trim and the window regulator track.
Run new tape across the top and down the back. Have the stainless steel trim, hammer and block of wood ready. Remember this is tempered glass. It is stronger than regular glass and laminated glass. But if bumped against anything it will break. I laid mine on the sofa, got the stainless trim lined up and gently tapped the block of wood with hammer and got the stainless strip in place. You may need some help, or put it against your legs.
Reinsert the window regulator into the door. Raise the regulator glass channel above the door. I let the back part stick over the back of the door and had my wife hold the wrench through the slot and under the glass channel. Apply new glass tape to the bottom of the glass.
Reinstall two screws through the stainless steel and into the window regulator. With the hammer and block of wood gently tap the top of the glass until the glass is seated into the window regulator channel.
Now that the glass is attached to the window regulator, pick up the glass and position it into the door. The rear stainless steel should be in the track and the front of the glass should be in the window glass track.
Position the window regulator so you can reinstall the guide and guide runner into place. Snug nuts onto guide.
Reattach motor to window regulator. Reattach wind glass adjustment nuts and bolt, but do not tighten yet.
Turn on the car key and gently work the window switch. You will have to adjust the window glass frame so that the window glass moves freely. Remember these window motors are old! Check and make sure that motor is not getting hot. You may have to let it sit for a few minutes. If the glass stops moving, let off the switch and do not force it. Keep working with adjustments until the door glass moves freely.
Once everything is working, reinstall the upper and lower glass stops. The upper ones will have to be adjusted. Adjust and close the door, adjust and the close door. It may take a few tries to get it right.
Tighten all nuts and bolts. Check and make sure the door glass still works and the door shuts good.
Reinstall the water barrier. I had to use tape on mine to hold it into place.
Reinstall the door panel, making sure all clips are in place and all are there. Local parts houses have these in stock. Line them up with holes in door and give them a whack with your hand.
Reinstall arm rest.
Reinstall the door handle. I slid the retainer clip on the handle and put it into place, and pushed, I heard a click, and it was locked into place.
Reinstall the stainless steel trim.
Replace the door lock by screwing it back on.
Clean the door glass, wipe off the body and clean the interior door trim.
You are good to go!!!
Richard D. Hord
Created: 27 June, 2009
Last Edited: 31 July, 2010
Email: webmaster@squarebirds.org
Return to Squarebirds Home.