
1958-1960 Thunderbird Shift Tube Selector Arm Replacement
The following information was provided to us by Neil Swartz - cuul59. Thank you, Neil!
Sloppy shifting on the steering column, improper indication of which gear you are in, dropping out of Park into Reverse unexpectidly are all problems that many of us have had to contend with. There is one item that is often missed when trying to fix those problems. Many of us have gone the route of replacing our worn shift lever, worn collar, worn detent plate, but not the Shift Tube Selector Arm. After some 50 years all of these can become worn and cause problems. One of our Down Under members has many years experience working on shift linkage and COM transmissions. He has said that in many cases, he found the Shift Tube Selector Arm to be the main culprit, worn or defective, and in need of replacement. This is something that is often overlooked. What happens is that the inside ring and the notch in the ring can become worn and cause it not to function correctly. Luckily, that part is available new from many of our vendors these days. Replacing it can be time consuming, and may be difficult, but the results are worth it. As we always say before you start any project and as you go, take a lot of pictures. If you do, you will have them to fall back on when you start putting things back together. Here is the step by step account of how Neil replaced his worn Shift Tube Selector Arm. Before you start this, disconnect the battery!
You asked what's involved and it's a pretty big job. In a nutshell;
1.You will need to pull the steering wheel.
•1958-1960 Tbird Steering Wheel
•1958-1960 Tbird Steering Gear
2. Then take off the shift collar after unscrewing the shift lever and turn signal lever. (replace the shift collar and shift lever if both are worn, especially if it is at all worn around the roll pin).
3. Disconnect the turn signal switch.
4. Disconnect the neutral switch wires (label the wires you disconnect from. It is important to also mark the position of the neutral switch before loosening it).
5. Loosen the firewall weather seal.
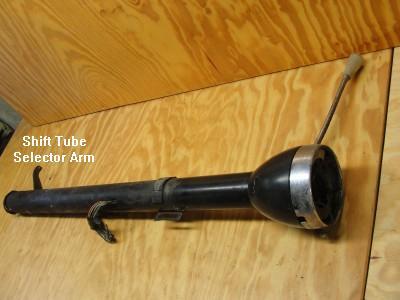
6. Disconnect the steering column from the clamp under the dash. The shift tube and selector arm will now slide out leaving only the steering shaft in place. The picture shows a complete steering column, but the shift lever, shift collar, and steering column would have been removed.
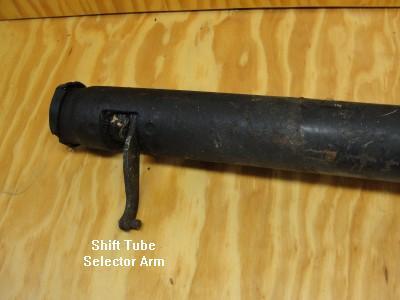
7. Before you put the new Shift Tube Selector Arm on, be sure that it fits over the tube and locking lug with just enough clearance to allow it to slide up and down smoothly, but not as loose as the old one! This is critical.
8. While you have it apart, you should also replace the shift detent plate if you haven't already. A new shifter lever arm and roll pin would make it all the more likely to achieve the results you would be happy with. I did all this in about 3-4 hours.
You can contact me offline if you have additional questions (cuul59@gmail.com)
Created 14 May, 2013
Last Edited: 15 May, 2013
Return To Technical Resource Library
Return to Squarebirds Home