 Tweet
Tweet
Aluminum radiator install in 60' T-Bird ...
July 6 2010 at 10:03 PM Mike Gaffney Mike Gaffney (Login gaffney1951)
Members Before pic.

The radiator is from Northern Auto, part# 209619. I chose the largest unit that would physically fit in the space available. It has two 1" rows and is a universal ford style. It ran $250 through my local radiator shop. I covered both sides of the core to prevent damage while taking measurements for fitment, and for sanding and polishing.

After mocking up fit I welded in the mounts I made from scrap I had around the shop.

The mounting surface at the top front of the rad. was originally bent upward and formed a channel with the one just to the rear of it. I bent it flat with a dead blow hammer in several passes back and forth. I added the rubber strip(some window seal I had, but self adhesive door weather strip would work just as well) to the rear one to help seal the shroud.

Here are pics of the A/C condenser and trans cooler with the top mounts in place. The bottum mounts are riveted in and are visible in the next shot. These again are made from scrap flat stock and the rubber pads are cut from garage door seal and contact cemented to the mounts, same for the rad. mounts.


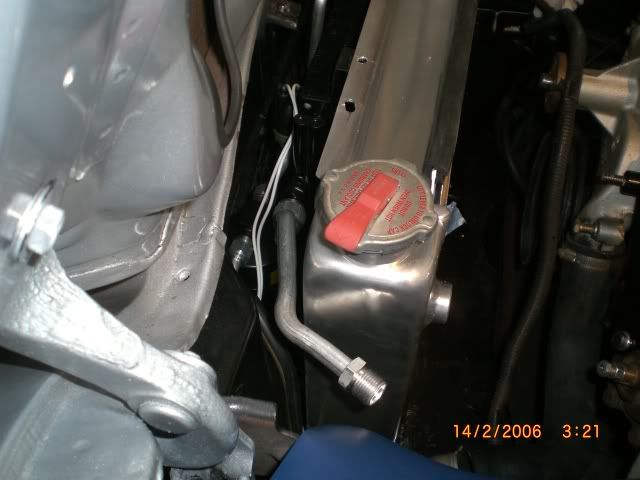
Here you can see where I cut away part of the inner hood structure for radiator cap clearance (the old puke tank was eliminated) . I used modeling clay to check for clearance. Once I had sufficient clearance I cleaned up the opening painted inside and covered the opening edge with hood scoop rubber molding.

As there is tons of room at the firewall I added this combo rad. overflow/windshield washer resivoir.

There was originally a 3/4" raised flange at the bottom of the core support opening. I decided to cut this out and weld the seam shut to expose more of the rad. core to the air stream. Sorry no before shot.
[IMG]file:///Users/Michael/Library/Caches/TemporaryItems/moz-screenshot.png[/IMG]

Had to do some minor clearancing on the battery tray and reshape the A/C lines on both sides.

The rad. shroud was scavenged from a 79 LTD parts car I have. The width was perfect but required some trimming on the bottom and at the A/C compressor.

The original top rad. mount was retained and spacers were made to fit between the mount and the rad.. I used some lexan that I had in conjunction with a rubber bungee I cut to length for vibration dampening. This upgrade should almost double my cooling capacity and will hopefully eliminate any overheating issues when the stroker engine goes in in Nov.


July 6 2010 at 10:03 PM Mike Gaffney Mike Gaffney (Login gaffney1951)
Members Before pic.
The radiator is from Northern Auto, part# 209619. I chose the largest unit that would physically fit in the space available. It has two 1" rows and is a universal ford style. It ran $250 through my local radiator shop. I covered both sides of the core to prevent damage while taking measurements for fitment, and for sanding and polishing.
After mocking up fit I welded in the mounts I made from scrap I had around the shop.
The mounting surface at the top front of the rad. was originally bent upward and formed a channel with the one just to the rear of it. I bent it flat with a dead blow hammer in several passes back and forth. I added the rubber strip(some window seal I had, but self adhesive door weather strip would work just as well) to the rear one to help seal the shroud.
Here are pics of the A/C condenser and trans cooler with the top mounts in place. The bottum mounts are riveted in and are visible in the next shot. These again are made from scrap flat stock and the rubber pads are cut from garage door seal and contact cemented to the mounts, same for the rad. mounts.
Here you can see where I cut away part of the inner hood structure for radiator cap clearance (the old puke tank was eliminated) . I used modeling clay to check for clearance. Once I had sufficient clearance I cleaned up the opening painted inside and covered the opening edge with hood scoop rubber molding.
As there is tons of room at the firewall I added this combo rad. overflow/windshield washer resivoir.
There was originally a 3/4" raised flange at the bottom of the core support opening. I decided to cut this out and weld the seam shut to expose more of the rad. core to the air stream. Sorry no before shot.
[IMG]file:///Users/Michael/Library/Caches/TemporaryItems/moz-screenshot.png[/IMG]
Had to do some minor clearancing on the battery tray and reshape the A/C lines on both sides.
The rad. shroud was scavenged from a 79 LTD parts car I have. The width was perfect but required some trimming on the bottom and at the A/C compressor.
The original top rad. mount was retained and spacers were made to fit between the mount and the rad.. I used some lexan that I had in conjunction with a rubber bungee I cut to length for vibration dampening. This upgrade should almost double my cooling capacity and will hopefully eliminate any overheating issues when the stroker engine goes in in Nov.


Comment