 Tweet
Tweet
I have my deluxe front end kit and shocks on order from Kanter and I've been perusing the shop manual to see what I'm in for. I've got a few questions:[ul][li]The manual lists a Ball Joint Removal Tool #T57P-3006-A as needed to take the ball joints out. Is this special tool really needed? If so, where do I get one? If not, how do I get the ball joints out without it?[/li][li]Will I need to have a machine shop press the control arm bushings in and out, or is there a means of doing that without a press? I seem to remember someone saying they had done so.[/li][li]For the stabilizer mounts and shock absorber mounts, it calls for RyGLYDE lubricant. What should I use there?[/li][li]The manual shows using a floor jack to release the spring pressure and to re-install it. It makes no mention of a spring compressor tool. Has anyone done it that way? Those coil springs are pretty intimidating to me.[/li][/ul]I might have more questions as I get into it, I'll let you know. :-P In the mean time, if anyone has any other pointers they learned along the way, please fill me in.
-
-
RE: Front end special tools and lube
OK, I just re-found the tips and suggestions in [a href="http://www.squarebirds.org/dcforum/DCForumID1/512.html"]this thread[/a], but it didn't answer my question about the lube and the ball joint tool.
-
RE: Front end special tools and lube
What I did was remove the cotter pin on one ball joint and then loosened the retaining nut several turns but did not remove it. For the upper nut, I first removed the bolt that holds the backing plate to the spindle to gain access for a socket over the ball joint nut. Using the coil spring to keep tension on the whole system, I used a fork shaped tool (can buy or rent at auto parts store) and a 5 pound sledge hammer (NOT a regular hammer-not enough mass) and the wedge in the fork seperated the parts after a few good wacks. You can "feel" the parts seperate as the spring pushes the parts apart. I then did the same operation on the other ball joint. Jack up the lower control arm, loosen both nuts, bleed down the jack, and remove the spring as per the shop manual. Removing the rivets for the ball joints is a job for an air chisel. If you do it by hand, you might finish by Christmas.
Comment
-
RE: Front end special tools and lube
Thanks Bob. I doubt my ball joints are still riveted, the car has 150,000 miles on it. Surely they've been replaced at least once! If they are still riveted, I might start thinking that maybe it really is only 50,000 miles instead of 150,000.
Another question: Did you pull the entire suspention apart at once? I'm thinking that I'll do lower arms, stabilizer bar and steering stuff first and leave the upper arms in place. Then put the lowers back together and tackle the uppers. That way I won't have to remove the spindles. Is that worth it, or is it easier to just pull everything, including spindles, at once?
Comment
-
RE: Front end special tools and lube
Instead of RyGLYDE, you can use silicone lubricant(not the glue).
Alexander
1959 Hardtop
1960 Golde Top
Alexander
1959 Hard Top
1960 Golde Top
sigpicComment
-
RE: Front end special tools and lube
I removed the spindle with all the various brake parts.
1. I replaced the rubber brake hose (probably as old as the car) and it was much easier to get at the wheel cylinder end on a bench rather than try to fit a wrench in tight quarters under the car.
2. I made the decision to pay a shop to press out and press in all the bushings so I brought them all 4 control arms at the same time and saved a trip. They charged me $60 and it was money I gladly spent to press out/in 16 bushings.
If you us jackstands to raise the car, I would suggest that you get the car as high as safely possible for best access. The lower control arm needs to clear the floor once it is loosened and hanging down. You will have to roll the floor jack from the opposite side and under the engine to later compress the spring in the lower control arm as you reassemble the suspension. I personally found it easier to first install the spindle to the LOWER ball joint stud (hand tighten nut), jack up the control arm and then guide the upper ball joint into the spindle slot as the coil spring is compressed. Since the upper control arm bushing nuts have not yet been torqued down, it is easily moved up and down to align the stud. The new ball joints are very tight and I had to use a piece of pipe over the stud to move it so it was aligned correctly.
Been there, done that. Good luck. By the way, I used some of that new liquid spray-on bandaid stuff. It works great to stop bleeding but it BURNS LIKE THE DEVIL for several seconds.
Comment
-
RE: Front end special tools and lube
I went through the brakes two years ago, rebuilt wheel cylinders, rebuilt master cylinder, new rubber lines, etc. I was trying to avoid opening up the brake lines and having to re-pack the wheel bearings. We'll see how it goes. The fun begins tonight as I get the car off the ground and start taking things off.
Thanks for the reminder of those ball joint forks. I've changed the lower ball joints on my 1993 Escort twice and 'rented' those from Autozone. Forgot all about that tool.
Comment
-
RE: Front end special tools and lube
Well, I got it up in the air last night. After seeing 40 years of crud (up to 3/4" thick) on the control arms, I decided to pull it all apart. Then I can clean up and paint the arms, drums and spindles. I've got these sweet 17" Boyd aluminum wheels on order and it would be a shame to see all that gunk and rusty metal through the shiny aluminum spokes.
My wheels arrive in less than two weeks, so I'm going to put off the suspension until fall. Then I can get the wheels properly fit and do a cruise-in or two.
Comment
-
RE: Front end special tools and lube
ONLY 3/4" of crud? You are lucky. I had to use a putty knife to peel off all that mess. BTW, did you determine if your ball joints are held on by rivets or nuts & bolts? Just curious.
Comment
-
RE: Front end special tools and lube
One time . . . years ago when San Jose Ford was in business, they rebuilt the frt end on the 60 for my dad. I don't know if they hosed him or not. They put complete upr & lwr cntl arms on it. They had them complete. Told him it was more cost effective than pressing bushings and to R&R the b/joints. I can see it would be less labor intensive. The arms were big bucks if I recall. They were OEM,
compl with "rivited" ball jnts. The frt end has been rebuilt since.
If that's the way Ford was doing it back then, it's poss your Bird has been redone. I can't see one of those front ends lasting over 100K.
You just can't believe how the heavier front sway bar helps. Stops the wallowing around. It just needs a rear, like I said in my last post, just enough to stop the side to side and the slight lean it still has. I WILL find one that works. I've got bigger fish to fry right now with this reman engine.
JB
Comment
-
RE: Front end special tools and lube
Looks like (hard to see through the crud!) the uppers are still riveted but the lowers are bolted on. That seems to jive with the 150K mileage rather than 50K. My '93 Escort daily driver has had lower ball joints twice and uppers never in 175K.
There's a gas station service sticker on the driver's door jamb that seems to read that some service was done at 86K, but it's hard to read.
I'll tear into it in late August or early September.
Comment
-
RE: Front end special tools and lube
drill out the rivets with 1/8 " drill bit first then move up to 1/4
then 5/16" once i did this the rivets were easly nocked out with a
good punch&hammer . after you disasemble and clean everthing up
you will find that the ball and heat treated iron pocket are normal .. and fit loosly . this does not make the car sway or ride
i was told by front end specialist this was good joint .
so i reinstalled with grade 8 bolts and jam nuts dave///
Comment
-
Will this work for a '61?
Hi Bob (or any other experienced person may want to chime in):
I found this quote when looking for info in the T57P-3006 tool for Ball Joint Removal. I see how you describe that you used a Pickle Fork and a 5-lb sledge to pop out the (lower?) ball joint from the Lower Control Arm.
I had recently put in new Upper & Lower L&R Ball Joints, but for some reason failed to replace the LCA Bushing at the Frame.
So now I need to do that, but don't want to damage the lower ball joint that I just put in last July.
Will your fork & sledge method damage the ball joint or the boot?
Have you any pictures that show how you did this that you could share?Geoff In Carlsbad
1961 Thunderbird Convertible aka: Betty:cool:
sigpicComment
-
Take two 1/2 inch high grade bolts. Screw them together with a coupling nut. Remove both ball joint nuts, reinsert upside down and screw in until they are flush with end of ball joint stud.
Place bolts and coupling setup between ball joint/ball joint nuts and screw them out to create pressure on both ball joints (forcing them apart). Hammer side of knuckle near the ball joint stud you want to release, should pop out.
The other ball joint will require press or tool. recommend this tool.
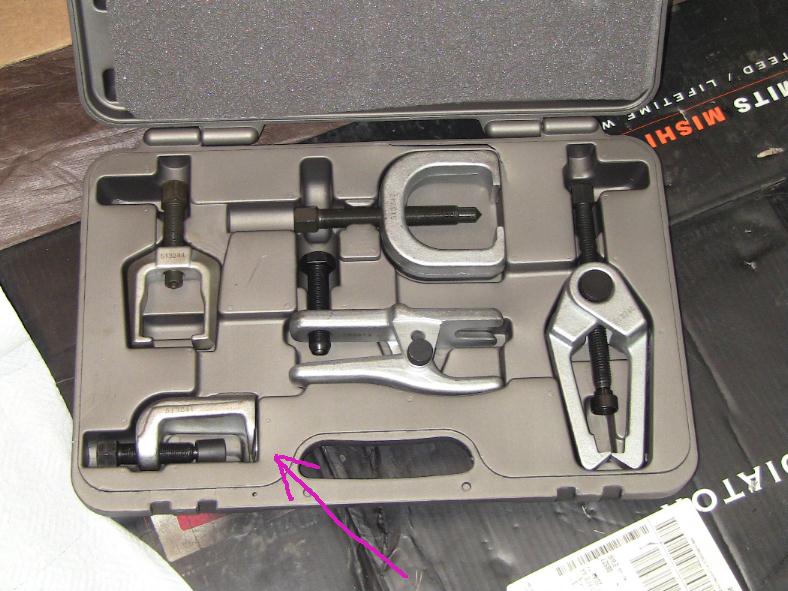 59-430-HT
Comment


Comment