Announcement

Collapse
No announcement yet.

Question on replacing a freeze plug

Collapse
X
 
  • Time
  • Show
Clear All
new posts
  • garyscc
    Newbie
    • Jun 4 2015
    • 10

    Question on replacing a freeze plug

    Hi, i recently bought a '59 convertible and i'm hopeful i can get it running. it sat for many years I poured water in the coolant reservoir and it all cam out through the passenger side freeze plug that is located above the tubular cross brace.

    I'd like to replace the freeze plug without removing the engine, if its possible is there a strategy or process to get adequate access and do this? i appreciate any help and suggestions.
  • jopizz
    Super-Experienced


    • Nov 23 2009
    • 8346

    #2
    There are some freeze plugs that are easier to replace than others. None of them are easy to do without having the car on a lift. You need to have enough leverage get the old one out and tap the new one in. The problem is that usually if one is rusted to the point where it's leaking then the others aren't far behind. That usually indicates that you have a lot of rust in the cooling passages of your block.

    John
    John Pizzi - Squarebirds Administrator

    Thunderbird Registry #36223
    jopizz@squarebirds.org 856-779-9695

    https://www.squarebirds.org/picture_gallery/TechnicalResourceLibrary/trl.htm

    Comment

    • Ford351c594
      Experienced
      • Mar 6 2015
      • 124

      #3
      your local parts store, (one of the big boxes ), should rent a freeze plug installer. It is just a wackable rod with a flex head and different size cups that go inside the freeze plugs. Its not the greatest tool, but can help a ton in situations like you are facing. Also what jopizz said, seems like when one goes, they all start going.

      Comment

      • Joe Johnston
        Super-Experienced
        • Dec 23 2008
        • 720

        #4
        rubber expandable types are also available that expand by turning a hex nut. I WOULD NOT trust them for the long term, but would be OK temporarily while you are debugging things. Eventually you will need to replace them all, so consider doing it right the first time.

        Comment

        • simplyconnected
          Administrator
          • May 26 2009
          • 8787

          #5
          Loosen the motor mount on the side you are working on, lift the engine slightly off the mount, REMOVE the mount.

          If you are doing the passenger side, the starter motor needs to be removed as well. Simply knock the old core plug IN. They usually turn sideways but if it falls all the way in there is nowhere for the plug to go. Stick you finger in the hole, fish it toward the opening and use a pair of pliers to pull it all the way out.

          You can see that this job is infinitely easier if the engine is out of the car.

          Pull all the plugs out on that side. Get your garden hose ready with a sock wrapped around it, turn the water on full blast then go back and forth from hole to hole with lots of water flow. Any junk in there will come out. Sometimes I use a coat hanger to scrape along the bottoms of the cylinders where larger pieces live. Again, water flow will wash the junk out the holes.

          I've never used a special tool to insert core plugs. I dry the hole, degrease the mating edges with lacquer thinner, spread a thin layer of Permatex Black on the casting edge and on the plug and simply tap the new BRASS core plug in with a hammer. If space is tight, turn the hammer sideways. - Dave
          Member, Sons of the American Revolution

          CLICK HERE to see my custom hydraulic roller 390 FE build.

          "We've got to pause and ask ourselves: How much clean air do we need?"
          --Lee Iacocca

          From: Royal Oak, Michigan

          Comment

          • garyscc
            Newbie
            • Jun 4 2015
            • 10

            #6
            thanks for all the suggestions. I intend to have the engine rebuilt in a few months - but I have to prioritize things at the moment. It will be great if I can get the car so I can move it around the driveway for a few months.

            I'll do as noted, remove starter and engine mount.

            I must say, I've worked on many old fords but I don't recall ever having such great access to the bell housing. I imagine ford did it like this so the thunderbird could sit low? I wonder if there are other reasons why this was done? thanks again. i'll be posting photos of the car soon.

            Comment

            • scumdog
              Super-Experienced

              • May 12 2006
              • 1528

              #7
              Originally posted by simplyconnected

              I've never used a special tool to insert core plugs. I dry the hole, degrease the mating edges with lacquer thinner, spread a thin layer of Permatex Black on the casting edge and on the plug and simply tap the new BRASS core plug in with a hammer. If space is tight, turn the hammer sideways. -Dave
              I go with what Dave says - but I have found a suitable sized socket fitted into the plug gives you something to tap on and helps keep the plug square-on to the hole. Probably slightly frowned upon by some this pounding on a socket thing but I use a random El-cheapo socket, not one of my good ones!
              A Thunderbirder from the Land of the Long White Cloud.

              Comment

              • Tbird1044
                Super-Experienced
                • Jul 31 2012
                • 1346

                #8
                Since your getting the engine rebuilt in a few months, I would just go with the expandable rubber freeze plug. Should last long enough for what you need. One other option would be to use liquid N2 and put the new plug in by shrinking it. Never done that, but it should work.
                Nyles

                Comment

                • Yadkin
                  Banned
                  • Aug 11 2012
                  • 1905

                  #9
                  Originally posted by scumdog
                  I go with what Dave says - but I have found a suitable sized socket fitted into the plug gives you something to tap on and helps keep the plug square-on to the hole. Probably slightly frowned upon by some this pounding on a socket thing but I use a random El-cheapo socket, not one of my good ones!
                  I use sockets for press work all the time. They are tools, not jewelry!

                  Comment

                  • simplyconnected
                    Administrator
                    • May 26 2009
                    • 8787

                    #10
                    Yes, I like Scumdog's socket idea as well. The only problem with using any kind of tool is that it takes up real estate. All this work is done from the bottom and there is hardly enough room to swing a hammer.

                    Rubber plugs are a bad idea. One guy tried using one behind his starter motor. What a disaster... The center stuck out too far and it cocked his starter motor. He tightened the starter screws as best he could but the bendix gear kept 'sticking' in the flex plate teeth. He thought he was saving money.

                    There is a right and a wrong way to do this job. For the sake of a few months, just replace the leaky core plugs then do the rest when you pull the engine.
                    Member, Sons of the American Revolution

                    CLICK HERE to see my custom hydraulic roller 390 FE build.

                    "We've got to pause and ask ourselves: How much clean air do we need?"
                    --Lee Iacocca

                    From: Royal Oak, Michigan

                    Comment

                    • JohnG
                      John
                      • Jul 28 2003
                      • 2341

                      #11
                      I replaced the one on the passenger side as it seeped coolant. I drove a flat blade screwdriver through it which allowed me to pry it out ( in spite of Dave's doubtless correct advice, I couldn't bring myself to push scrap metal into the motor . . . sorry Dave!)

                      I did not need to do anything with the starter motor. Just got the motor mount out of the way.

                      To push the new one in, I found a wood dowel about an inch wide or so, and cut it to fit the situation as far as length went. I may have cut the end at an angle - don't remember. But working with wood made it easy to adjust to the situation. With the sealant, the rest went fine. Remember to give the sealant time to sure.

                      If/when you get one from an auto parts store, check that you really have the right diameter one before you remove the old one and get 1/2 way into the job only to find you have the wrong size. I had to make 3 stabs at it before they gave me the right one ( "ya, sure - - we got that. Here ya go.") (does any remember the diameter or have a part # ? )

                      John
                      1958 Hardtop
                      #8452 TBird Registry
                      http://tbird.info/registry/DataSheet...r~equals~8452)

                      photo: http://www.squarebirds.org/users/joh...d_June2009.jpg
                      history:
                      http://www.squarebirds.org/users/johng/OCC.htm

                      Comment

                      • jopizz
                        Super-Experienced


                        • Nov 23 2009
                        • 8346

                        #12
                        The freeze plugs are about 1 3/4 or 1.75. There's probably confusion between freeze plugs and core plugs which is why you got the wrong sizes.

                        John
                        John Pizzi - Squarebirds Administrator

                        Thunderbird Registry #36223
                        jopizz@squarebirds.org 856-779-9695

                        https://www.squarebirds.org/picture_gallery/TechnicalResourceLibrary/trl.htm

                        Comment

                        • simplyconnected
                          Administrator
                          • May 26 2009
                          • 8787

                          #13
                          Originally posted by JohnG
                          ...I couldn't bring myself to push scrap metal into the motor...
                          Give it a good rap with a hammer and screwdriver on the inner side of the 'cup'. Stay away from the mating surfaces so they are not scratched:


                          They normally turn sideways without going in (like the one on the right). Here's what happens if you punch a core plug all the way into the hole:


                          There is nowhere for the plug to go! Reach in, grab the plug and pull it straight out with a pair of pliers.


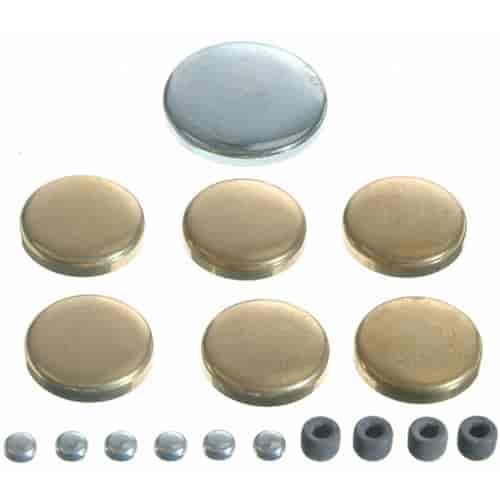
                          Yes, you can buy 1-3/4" core plugs individually but they are also sold in sets made of brass (or steel) for your engine. Here is an entire set of plugs for FE engines:


                          Sealed Power#844-381-8017
                          Brass Freeze Plug Kit •1958-76 Ford V8
                          •330, 332, 352, 360, 361, 390, 391, 406, 410, 427 and 428 FE Engines

                          jegs.com price is $11.99 with free shipping.
                          The large steel plug is for your cam (at the rear of your engine block). It is made of steel because the inside is immersed in motor oil.

                          This job is much simpler than you think. I hope the pictures help. - Dave
                          Member, Sons of the American Revolution

                          CLICK HERE to see my custom hydraulic roller 390 FE build.

                          "We've got to pause and ask ourselves: How much clean air do we need?"
                          --Lee Iacocca

                          From: Royal Oak, Michigan

                          Comment

                          • garyscc
                            Newbie
                            • Jun 4 2015
                            • 10

                            #14
                            thanks for the advice - it worked great!

                            I bought a 1-3/4" rubber plug and it tighted up very well. Plus, when I put the engine mount back on it overlaps the large metal washer of the freeze plug - so it appears it would be impossible for the rubber plug to pop out.

                            However.... I'm getting zero compression in #4 and #7. The valves are going up and down (#7 had a bent pushrod, but I replaced it with a new one).

                            So, it would appear some of the valves are burned, since when I added oil to the cylinders it did not affect compression.

                            As a result, I'm planning on removing the intake and heads in the next couple days - if the cylinders look ok i'll probably leave the bottom end as it is. Does that sound like a decent plan?

                            Comment

                            • simplyconnected
                              Administrator
                              • May 26 2009
                              • 8787

                              #15
                              Originally posted by garyscc
                              thanks for the advice - it worked great!
                              I love it.
                              Pull your engine, do it once and do it right. - Dave
                              Member, Sons of the American Revolution

                              CLICK HERE to see my custom hydraulic roller 390 FE build.

                              "We've got to pause and ask ourselves: How much clean air do we need?"
                              --Lee Iacocca

                              From: Royal Oak, Michigan

                              Comment

                              Working...
                              😀
                              🥰
                              🤢
                              😎
                              😡
                              👍
                              👎