Announcement

Collapse
No announcement yet.

1962 Thunderbird air bagged

Collapse
X
 
  • Time
  • Show
Clear All
new posts
  • Petrolhead
    Experienced
    • Jul 2 2007
    • 403

    1962 Thunderbird air bagged

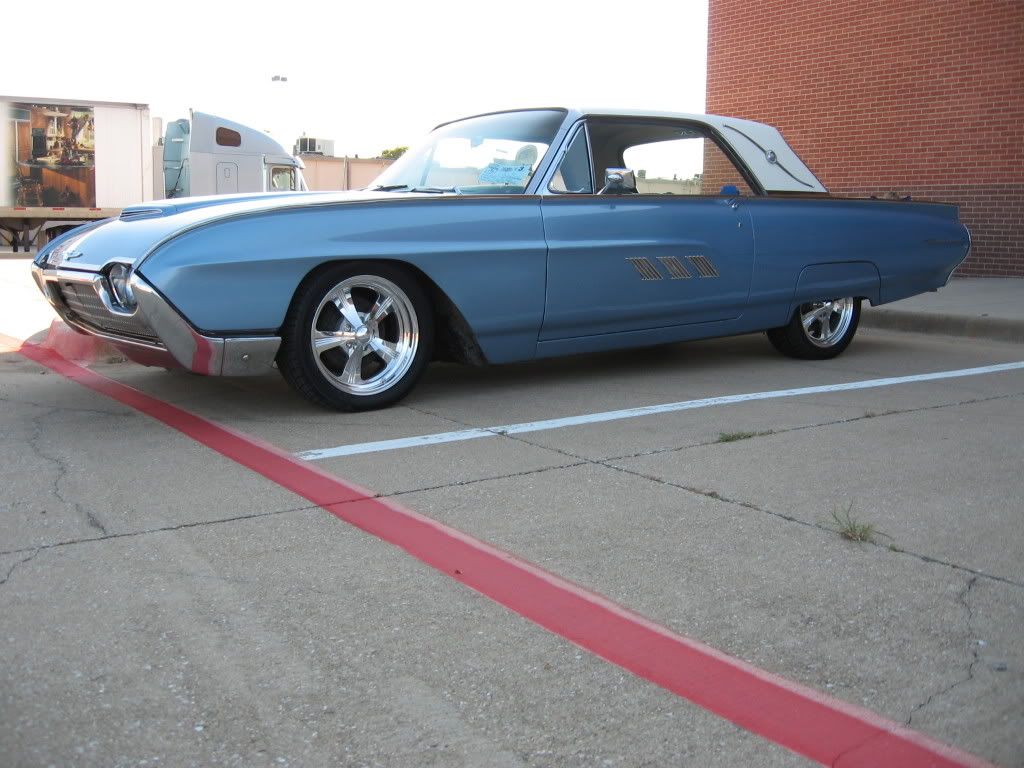
    Just got my bagged '62 hardtop back from the chassis shop, I'm really pleased with the way it sits. The car almost has its sills on the ground at rest, and with the bags fully inflated it's 1/2" lower than factory ride height.
    I haven't driven it, apart from on and off a tow truck, as it isn't legal (no lights etc). Hopefully it'll ride and handle okay.
    The front is Air Ride shockwaves mounted down through the a-arm to get it low, the rear is Air Over Leaf with fabricated forward control arms to prevent leaf spring wrap up. It runs one tank, two Viair compressors and SMC 1/2" valves and lines from suicidedoors.com. I did most of it in my home garage, except for the fabricating the arms and brackets, modifying the rear shock mounts and all the welding.
    There's a few more weekends worth of panel and paint, then I'll piece it back together. The doorhandles and badges have been shaved.
    There's a big show here in Kumeu mid January, I'd really like it done for that.
    I'll post a few more pics once there's more progress.
    Cheers
    Alistair
    Attached Files
  • Texas Landau
    Apprentice
    • Mar 6 2007
    • 40

    #2
    Man, that is slick! If I had not just done all my suspension las year, I would do that, too! I did cut one coil off of the front springs, and I really like the way it looks. I just have to be carefull where I drive it!

    Randy

    Comment

    • dgs
      Super-Experienced
      • Feb 13 2003
      • 962

      #3
      That's real nice. I can't wait to see it complete. Air bags are on my list of "wouldn't that be cool", but it's long down the list. Not likely for some time.

      BTW - I've seen a fair number of custom birds at the annual Good Guys nationals here in Columbus OH, most of them Bullet Birds. Check out my T'bird gallery (or my main gallery page with several galleries of photos from Good Guys).

      This orange one was one of the nicest. (and the pictures don't capture the beautiful, subtile shades of orange paint fades):


      Check out how 'tall' that Camaro looks in comparison.

      DGS (aka salguod)
      1960 Convertible - Raven Black, Red leather
      www.salguod.net

      Comment

      • Petrolhead
        Experienced
        • Jul 2 2007
        • 403

        #4
        DGS, thanks for the links to your galleries, very cool. I love that tangerine '63, I think it's buily by Rick Dore? I've seen it in a few magazines and books on customs. Mine won't be anywhere near as good as that, and don'yt know if I could bring myself to chop the top (:
        Texas landau, your '63 Bird's good looking, sits very nice, awesome wheel choice - really suits the car. Paint looks mint, have you had the car long?

        Comment

        • Texas Landau
          Apprentice
          • Mar 6 2007
          • 40

          #5
          Thanks! I can't wait to see yours when it is done!

          I've had the car since 2004; it was my father's. It was repainted the original color back in 1984, but the car has always been garage kept. The interior is all original. headliner to carpet, dash to package tray, and it is in very good condition although it is starting to show it's age.

          I think that tangerine bird is awesome! I love that color with the white interior. I saw that blue roadster 10-12 years back in a magazine, and I always loved the windshield treatment on that car.

          Comment

          • 6TB1RD
            Experienced
            • Apr 9 2006
            • 382

            #6
            Originally posted by Petrolhead
            The front is Air Ride shockwaves mounted down through the a-arm to get it low, the rear is Air Over Leaf with fabricated forward control arms to prevent leaf spring wrap up. It runs one tank, two Viair compressors and SMC 1/2" valves and lines from suicidedoors.com. I did most of it in my home garage, except for the fabricating the arms and brackets, modifying the rear shock mounts and all the welding.
            Alistair
            Petrolhead:
            She's going to look real sharp when done

            Any chances of getting pictures of the mods. to the rear. I too have been thanking of bagging my '60 and would like to see how the rear is set up. I know the front is pretty straight forward but converting rear Leaf's is more work.
            George (Papa of 9)
            1960 H/T :rolleyes:
            Home Page http://squarebirds.org/users/6tb1rd/
            http://www.tbirdregistry.com/viewdat...ryNumber=31811
            sigpic

            Comment

            • Petrolhead
              Experienced
              • Jul 2 2007
              • 403

              #7
              Hi 6TB1RD

              No problem at all to post some pics, thanks for asking. I'll be crawling around under it in the next few days and will take some detail shots. This is the only one I have and is work in progress - the control arm mounting brackets have yet to be gussetted. We only used one leaf, and a lowering block to get it down in the weeds. The leaf basically locates the rear end, and the air bags take the weight of the car.
              Cheers, Alistair
              Attached Files

              Comment

              • 6TB1RD
                Experienced
                • Apr 9 2006
                • 382

                #8
                Nice

                Nice:
                Thanks for the picture can't wait so see more, that set up I would of never thought.

                Can't wait to here how she rides
                George (Papa of 9)
                1960 H/T :rolleyes:
                Home Page http://squarebirds.org/users/6tb1rd/
                http://www.tbirdregistry.com/viewdat...ryNumber=31811
                sigpic

                Comment

                • Guest

                  #9
                  Petrol can you post more pix of you bagging your 62?
                  And 6tbird did you ever bag your bird?

                  Comment

                  • Petrolhead
                    Experienced
                    • Jul 2 2007
                    • 403

                    #10
                    Hi El Guapo

                    The panel and paint turned into much more of a major, have stripped all the body back to bare steel and two-pack epoxied, repaired the dings and primed. It's still not painted and I haven't got back into the air bags since my last post and haven't taken any more pics sorry.

                    Here are some photos I have on file, showing a few of the components.

                    The tank is mounted up under the parcel shelf so I haven't lost too much trunk space. I mounted two sets of solenoids (valves) on the tank, and the other two sets are bolted to the trunk floor in front of the tank. it's a really tight fit, but keeps the installation looking clean (you can't see the solenoids) and compact.

                    There are eight solenoids - one for up, one for down, for each corner.

                    It's all working now, I made a switch panel to replace the ashtray (didn't want to chop up the interior). It's panel steel bent to shape , was quite involved as the ash tray receptacle also doubles as the latch mount for the console lid etc etc. I covered the panel in thin high density foam, had some vinyl sprayed to match the interior, and covered it with that. Worked out okay. The switches are momentary on - off - on, so one switch does each corner of the car - pull the switch up and that corner goes up, push it down and it lowers. This is called a four-way system, which is preferable to a two-way which allows air to move from left to right wheels on the same axle - and upsets ride and handling.

                    I did the wiring, it's not hard and there are some good diagrams on the Net. I used a solenoid to start the compressors. The compressors come on at 110psi and switch off at 150. A pressure switch is mounted in the top of the tank.

                    I''ll put the pics up in separate posts, not sure if it makes a difference in download speed, hopefully it does.

                    I got all the parts from suicidedoors.com, exceptionally good company, nothing was a problem and very quick emails with advice etc. It's important when dealing with a company on the other side of the world. Good gear too: SMC valves, Viair compressors etc. Also got my shaved doorhandle kit off them, but made my own shaved trunk lock set-up.

                    Hope this helps, don't hestitate to ask if there's any info you need.

                    Cheers

                    Alistair
                    Attached Files

                    Comment

                    • Petrolhead
                      Experienced
                      • Jul 2 2007
                      • 403

                      #11
                      El Guapo, more pics

                      This is from inside the car looking back to the trunk. It looks complicated but it is pretty straightforward. I'll close it in and them cover the bulkhead with Dynamat to keep the noise and heat from the compressors out of the cabin.

                      There are a lot of different size and shape tanks available to suit various installations

                      Don't know if I'll use the skirts, they do make it look lower though.
                      Attached Files

                      Comment

                      • Petrolhead
                        Experienced
                        • Jul 2 2007
                        • 403

                        #12
                        El Guapo, here's the switch panel details

                        Each gauge has two needles, so I used one guage for the front bags, one for the rear bags. When the two needles are lined up in the gauge the pressure's the same side to side.

                        The extra toggle switch turns the compressors off. This is important because if the car is parked for any length of time and the bags lose a little air (they shouldn't do), the compressors will turn on and off automatically until the battery's flat.
                        Attached Files
                        Last edited by Petrolhead; May 26, 2008, 05:43 PM.

                        Comment

                        • Petrolhead
                          Experienced
                          • Jul 2 2007
                          • 403

                          #13
                          El Guapo, here's the rear air over leaf under construction.

                          The lower shock absorber mount has been modified and is longer to maintain shock travel.

                          The two sping clamps (I think that's what they're called) have been welded together to effectively create lowering blocks.

                          The removal of the rear leafs as per the kit's instructions (Air Ride says a minimum of two, but we're trying one) means that the spring can wrap up into an 'S' shape under hard acceleration. To eliminate this, and to better locate the rear end, the chassis shop made a single control arrm. Here it's just mocked up, the front and rear eyes of the arm, which have rubber bushes, now have solid gusseted mounting brackets.

                          At the moment all the wiring's out of the engine bay as I've just painted under there. As soon as it's all back in I'll be able to raise the bags and get some better photos for you. Should hopefully be this weekend.

                          I've also attached pics of the engine bay, it feels like a major milestone to finally get some colour on the thing after a year.

                          Cheers

                          Alistair
                          Attached Files
                          Last edited by Petrolhead; May 26, 2008, 05:55 PM. Reason: bad spelling

                          Comment

                          • Petrolhead
                            Experienced
                            • Jul 2 2007
                            • 403

                            #14
                            El Guapo, last pic

                            I purchased an Air Ride front Shockwave kit for the '62. It was supposed to suit 61 to 64, but Air Ride engineered it using a '63 and the front suspension changed quite significantly at the end of '62 - the upper and lower shock mounts aredifferent, as is the upper coil spring pad.
                            Apparently this is the first time Air Ride struck this and Darren was quite embarrased. He was also extremely helpful, and even sent some brackets down here at no charge. I couldn't have asked for better service.
                            The problem was that the Shockwaves were too long for the '62, and even fully deflated the car sat higher than stock.

                            In the end the chassis guys mounted the shockwaves down through the upper a-arms instead of on top, using custom made L-shaped brackets that you can see in the photo. They use the same bolt holes as the factory lower shock saddle.

                            We had to notch the a-arm to clear the knob for the Shockwave's rebound adjustment. These have since had their reinforcing lip welded on, and is away getting crack tested at the moment - can't be too careful.

                            You'll see that there are two extra holes in the bracket - this is so we can adjust the ride height up or down if we wish.

                            The air lines will run under the car, I'm going to use high pressure 1/2" steel lines to avoid stone damage - normally they're 1/2" nylon.

                            Cheers

                            Alistair
                            Attached Files

                            Comment

                            • Guest

                              #15
                              This is excactly what I'm looking for..Looking @ buying a whole package from a guy and a friend that has done his Catalina is going to help.
                              I'm shure I'll have a lot more questions as this progresses.
                              Thanks a ton once again.
                              Cheers!

                              Comment

                              Working...
                              😀
                              🥰
                              🤢
                              😎
                              😡
                              👍
                              👎