

 Tweet
Tweet
I would like to confirm my order from Bird Nest but I need to know if anyone uses the Thunderbird Restoration Guide and if it's worth having it?
-
-
Eric's 1960 T-Bird
Eric if you replace your Shop Manual, buy the CD version. Then when you need information to use to work on the car, just print it out, take it to the car, and if you get grease on the pages, throw them away. The CD is about $11 cheaper than the book. As for the Restoration Guide, I will let someone else comment on that.
Ray Clark - Squarebirds Administrator
The Terminator..... VTCI #11178 ITC #6000 Yellow Mustang Registry (YMR) #12188
Contact me via Private Message for my email address, or Call (Cell) 210-875-1411
https://www.squarebirds.org/picture_gallery/TechnicalResourceLibrary/trl.htm
Faye's Ovarian Cancer Memorial Website.
https://faye.rayclark.info/index.htmlComment
-
Thank you Ray.
I already have a computer version of the manual and will print pages as needed.
Just wondering if there is maybe more information or pictures in the Guide...Comment
-
John Pizzi - Squarebirds Administrator
Thunderbird Registry #36223
jopizz@squarebirds.org 856-779-9695
https://www.squarebirds.org/picture_gallery/TechnicalResourceLibrary/trl.htmComment
-
If you are referring to the 58-66 guide by William Wonder I vote it is being well worth while. I bought that book and shop manuals before I bought my car. I was looking for a 61-66 convertible - preferably a Sport Roadster - and wanted to know how to tell the differences between a genuine SR and a fake. The book has lots of information and well worth reading the sections that are of interest. A few dollars spent on a couple of books, puts a lot of knowledge at your fingertips.I would like to confirm my order from Bird Nest but I need to know if anyone uses the Thunderbird Restoration Guide and if it's worth having it?
Edit/Delete Message
Edit - I also must agree with jopizz below!Comment
-
Hello
All the bolts I receive from Bird nest (oil pan, Exhaust manifold and rocker cover) are "in the white" un-painted.
How are supposed to be finished the bolts, nuts and washers on the front suspension.
I cleaned them by sand blasting and am wodering if I shall paint them black or leave them "to be rusted later"?Comment
-
The bolts are normally not painted. If you are worried about rusting you can spray them with some flat clear before you install them or dab it on with a brush afterward.
JohnJohn Pizzi - Squarebirds Administrator
Thunderbird Registry #36223
jopizz@squarebirds.org 856-779-9695
https://www.squarebirds.org/picture_gallery/TechnicalResourceLibrary/trl.htmComment
-
My memory fails as much as my notes.
Anyone can remind me how/where to install this "washer" that goes on the end of the steering power cylinder. Being too small, it do not "cap" the nut. (replacement parts on top, originals on bottom)
Also I am replacing the bushings on the idler arm. One goes through a rod and the other one through the idler arm plate.
Question is that they are longer than where they go so how do we have to adjust the depth we seat them in?
My memory and my notes are not involved there as the car had a different system of bushing originally.
Comment
-
John Pizzi - Squarebirds Administrator
Thunderbird Registry #36223
jopizz@squarebirds.org 856-779-9695
https://www.squarebirds.org/picture_gallery/TechnicalResourceLibrary/trl.htmComment
-
Hello there
I worked on the manual to put back together the front suspension.
I remain concerned about how deep to seat the bushings in the arms.
Replacement bushings do not have any shoulder to limit their position.
On the upper arm the limit will be made against the inner shaft.
On the lower arm though. The way we'll put them in will affect the "size" or width of the assembly.
Now we have shims there. So I assume this dimension is critical and must be kept close to the original. But I have no mean to duplicate the original dimension (which I did not measured).
I guess I am missing something here.Comment
-
I've done many of them and I've never used any measurements. I go by the picture in the manual for the longer bushing. The shorter bushing is centered in the arm.
JohnJohn Pizzi - Squarebirds Administrator
Thunderbird Registry #36223
jopizz@squarebirds.org 856-779-9695
https://www.squarebirds.org/picture_gallery/TechnicalResourceLibrary/trl.htmComment
-
Sorry John
I was talking about the bushings on the Upper and lower arms.
Question being about the 2 bushings on the lower arm.Comment
-
Eric,
I should've read the question more thoroughly. As for the lower arms I suggest you do a search. There have been many threads that deal with the replacement of lower arm bushings. I'm sure some have had pictures that should help you out.
JohnJohn Pizzi - Squarebirds Administrator
Thunderbird Registry #36223
jopizz@squarebirds.org 856-779-9695
https://www.squarebirds.org/picture_gallery/TechnicalResourceLibrary/trl.htmComment
-
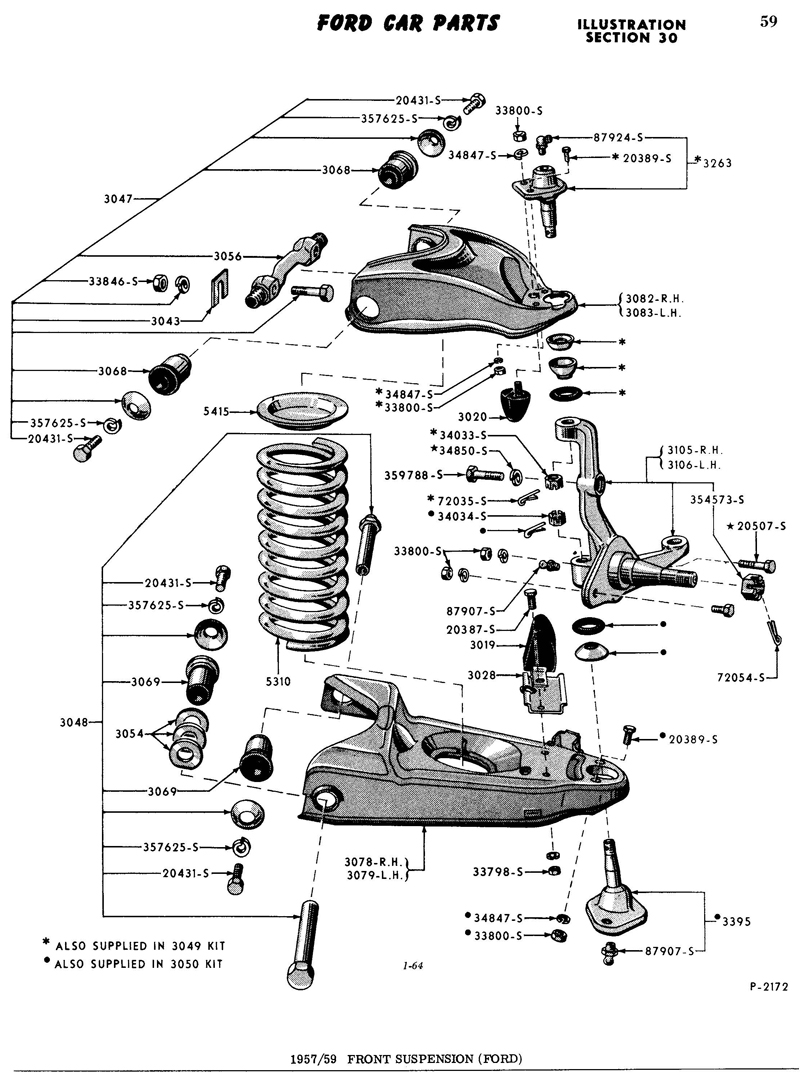
The illustration shows (front 3054) shims for the lower arm ONLY. That is because after you assemble your lower control arm and bushings, the assembly is butted-to the #2 crossmember and shims take up any remaining space in the FRONT. So in other words, everything is referenced from the #2 crossmember (that the engine mounts are welded to).
As John said, no measurements are necessary. The lower control arm shims are simply made of mild steel if you should need more. Older models had square shims but modern models used round. It doesn't matter, they're just shims. I think they are 1/16" (~1.5mm) thick. When the bolts are tightened, any remaining 'stretch' will be equalized between both bushings so take out as much gap as possible but don't be precise. (Think in terms of the production assembler. He gets one minute per car.)
After you seat your lower control arm bushings TO THE SHOULDER STOPS, the car body bolts and shims hold the inner bushing sleeves solid (so they can not rotate or move). If you didn't find or see your lower shims, they might be stuck to the body (actually to the #1 crossmember) where the large 7/8" bolt fits through.
It's important you DO NOT TIGHTEN any suspension bolts until the car is on its wheels. I would give it a bounce or two first, then tighten them. If you tighten whilst the wheels are hanging, you will hyperextend the urethane and break it inside the bushings.
Upper Control Arms don't get shims on the bushings. Those bushings butt against the pivot shaft on the inner sides and bolts with large washers tighten the outer sides to the pivot shaft. If there is any difference between old and new bushings, the FRAME SHIMS (3043) will compensate.
After the car is sitting at the usual stance and the bolts are tightened, it's ready for a front end alignment. - Dave
EDIT: Examine both of these bushings:

This is a 1955-1960 lower bushing. Notice it does have many protrusions that ARE a shoulder stop. (They also prevent the outer shell from rotating.)

Here is a 1958-60 upper bushing. It also has a shoulder stop but it looks slightly different.
Now, notice that both bushings have TEETH on the ends of the inner sleeves. This is to prevent them from turning. All rotation is done with urethane so the bolts should never show signs of wear.Last edited by simplyconnected; October 24, 2018, 02:28 PM.Member, Sons of the American Revolution
CLICK HERE to see my custom hydraulic roller 390 FE build.
"We've got to pause and ask ourselves: How much clean air do we need?"
--Lee Iacocca
From: Royal Oak, MichiganComment
-
Thank you
I was reading some older posts you made about front suspension but did not find the reply.
I also went back to the manual and found what confused me.
They said to install the arm and shims as needed to remove any fore and aft movement.
That is where I understood re-install the shims you removed before.
That is different. Now I got it (at last).
I also well noted (and John already gave a word about it) that the final tightening must be made on the wheels.
From what I can remember I have well the same bushing as on your picture, (car is a 60.)
Hopefully I can make some progress on saturday.
EricComment


Comment