Announcement

Collapse
No announcement yet.

Rear Axle Housing Options

Collapse
X
 
  • Time
  • Show
Clear All
new posts
  • toddgilroy
    Experienced
    • Aug 30 2014
    • 411

    Rear Axle Housing Options

    While I was getting read to replace my rear springs and brakes I thought it was a good time to clean up my rear axle housing. I could tell it was a little rough in spots, but some initial cleanup revealed some pretty extensive and deep pitting. Was thinking about trying some high-build primer and paint to make it look a little more smooth and stop the rust. But I am concerned about how sound the remaining steel is considering the depth of some of the pitting.

    Looking for thoughts on whether this can be salvaged (and be safe) or if I should save the effort and look for a replacement at a salvage yard or eBay?

    I know the Ford 9-inch was used in a lot of vehicles for many years, but are the Squarebird housings common to many other vehicles (width, spring perches, etc.?
    Attached Files
    Todd Gilroy
    1960 Tbird Convertible
    Thunderbird Registry #54651
  • Dakota Boy
    Super-Experienced
    • Jun 30 2009
    • 1561

    #2
    lots of good information on the Ford 9" can be found here:

    http://www.tbirdregistry.com/viewdat...ryNumber=33517

    Comment

    • simplyconnected
      Administrator
      • May 26 2009
      • 8787

      #3
      Todd, the housing is made of sheet metal. A good fabricator would have no problem bringing it back to life either by replacing some of the tubing or repairing what you have.

      I'm concerned with the inside. So many of these rear ends go to their grave with original lube still inside. For over fifty plus years your gear lube has been churning steel particles around your gears and bearings. More pieces are hidden in nooks and crannies. It needs to be opened, washed, carefully inspected, renewed and reassembled using fresh 90W gear lube.

      If you prefer a different gear ratio, now is the time to pull the trigger. - Dave
      Member, Sons of the American Revolution

      CLICK HERE to see my custom hydraulic roller 390 FE build.

      "We've got to pause and ask ourselves: How much clean air do we need?"
      --Lee Iacocca

      From: Royal Oak, Michigan

      Comment

      • toddgilroy
        Experienced
        • Aug 30 2014
        • 411

        #4
        It was finally warm enough to get outside and clean up the rear diff after letting it soak in diesel for a while. Cleaned off the caked on crud and things don't look too bad, but honestly I don't have a good idea what they should look like. The teeth on the gears look pretty good and don't appear to show uneven wear, and there were only two small pieces of metal in the fluid when I drained that.

        One thing that looks odd is this ring that appears to be ground or worn away on the locker. It is hard to tell by the picture, but it is not symmetrical as it rounds the locker.
        Attached Files
        Todd Gilroy
        1960 Tbird Convertible
        Thunderbird Registry #54651

        Comment

        • scumdog
          Super-Experienced

          • May 12 2006
          • 1528

          #5
          Originally posted by simplyconnected
          Todd, the housing is made of sheet metal. A good fabricator would have no problem bringing it back to life either by replacing some of the tubing or repairing what you have.

          I'm concerned with the inside. So many of these rear ends go to their grave with original lube still inside. For over fifty plus years your gear lube has been churning steel particles around your gears and bearings. More pieces are hidden in nooks and crannies. It needs to be opened, washed, carefully inspected, renewed and reassembled using fresh 90W gear lube.

          If you prefer a different gear ratio, now is the time to pull the trigger. - Dave

          My '66 had a leaky axle seal, in checking the lube it looked like molasses so I stripped the rest of the rear-end, the axle surface, the crown-wheel etc had numerous black pits on them, I suspect a large amount of water-contamination. (What are your thoughts Dave?).

          So me and Mrs scumdog heaved and grunted and removed the housing and stripped it, we had the housing steam-cleaned, had new axle bearings fitted as well as a new ($400!) crown-wheel & pinion fitted (Plus bearings etc).

          It turned out I had a LSD (No, not the drug, it's the Kiwi term for a locker type centre - Limited Slip Differential.)

          Yet the tag on the rear-end did not indicate this.??

          Now I have peace of mind that the rear end is sound. (I already had peace of mind until the axle-seal leak indicated the lube was crap!)
          A Thunderbirder from the Land of the Long White Cloud.

          Comment

          • simplyconnected
            Administrator
            • May 26 2009
            • 8787

            #6
            Todd, I see the damage in the following picture. I would really like to see a picture of the other side as well (the other part that is scraping).

            I hope you are not talking about a "Detroit Locker" setup that is strictly used at a straight drag raceway. On the streets, a Detroit Locker is dangerous and it makes your wheels hop going around corners. I guess the 'rachet' type is ok if you can stand the noise.


            Originally posted by scumdog
            My '66 had a leaky axle seal, in checking the lube it looked like molasses so I stripped the rest of the rear-end, the axle surface, the crown-wheel etc had numerous black pits on them, I suspect a large amount of water-contamination. (What are your thoughts Dave?).

            So me and Mrs scumdog heaved and grunted and removed the housing and stripped it, we had the housing steam-cleaned, had new axle bearings fitted as well as a new ($400!) crown-wheel & pinion fitted (Plus bearings etc).

            It turned out I had a LSD (No, not the drug, it's the Kiwi term for a locker type centre - Limited Slip Differential.)

            Yet the tag on the rear-end did not indicate this.??

            Now I have peace of mind that the rear end is sound. (I already had peace of mind until the axle-seal leak indicated the lube was crap!)
            A few thoughts... Limited Slip Differential (GM calls it Posi-Traction) contains clutches stacked into clutch packs. These clutch plates can and should be rebuilt. Over time, the clutch material contaminates the 'dope' (90W) gear lube and that's why yours looked so bad. These clutches also require a small container of "Friction Modifier". About every 50,000 miles, I poured it into my Mustang 8.8" axle because the owner's manual flagged it out.

            Friction modifiers provide additional slipperiness to lower operating temperatures by reducing the sliding friction in hypoid gears. This is important as most folks have no idea how hot their differential gets, just transferring power 90 degrees, then we add clutches that tightly hold the axles in parody until one slips (the other takes over).

            Bearing replacement is only necessary if the old ones are overheated (discolored), laminated or visibly bad. Otherwise, with proper lubrication bearings and gears should lase many hundreds of thousands of miles. Again, with proper maintenance.

            Pinion gears are more susceptible to wear because they go around many more times than the ring gear. I have seen worn out pinion gear teeth that look like sharp 'knife-edges'. I've never seen a ring gear that wore out. All rear end gears are heat treated heavy steel. Water may pit them but that has no ill effects on the operation.

            Remember that heat I was talking about? The worst treatment is to let a car sit outside for years. They need to be worked, to create heat and to naturally evaporate any condensation that may accumulate in the transmission and rear end oils.

            I cannot stress enough, change your brake fluid every three years and your transmission and gear lube every 60,000 miles. The REAL filtration comes when you discard old oil.

            I broke a couple teeth off of a spider gear many years ago. The case-hardened pieces get lodged between gear teeth and lock up your axle so nothing moves, like throwing it into 'Park'. 1/4-MPH is too fast when this happens.

            Steam is not necessary but it's a nice touch. Simple kerosene or diesel oil and a brush work well as an axle housing and gear wash. Little flakes of steel hide in all the crevasses so it's important to clean the whole axle case, as you have. Good job! - Dave
            Member, Sons of the American Revolution

            CLICK HERE to see my custom hydraulic roller 390 FE build.

            "We've got to pause and ask ourselves: How much clean air do we need?"
            --Lee Iacocca

            From: Royal Oak, Michigan

            Comment

            • toddgilroy
              Experienced
              • Aug 30 2014
              • 411

              #7
              This is the other side.

              No Detroit Locker...I just thought that was what the part was called.

              Thanks!
              Attached Files
              Todd Gilroy
              1960 Tbird Convertible
              Thunderbird Registry #54651

              Comment

              • simplyconnected
                Administrator
                • May 26 2009
                • 8787

                #8
                I don't know how this could be anything but a bearing problem. There are two bearings on either end of your Differential Gear Case Assembly. They are clamped firmly in place to the Differential Carrier Assembly by means of huge 1/2" bolt caps.

                This rear end must have made noise and all that metal had to go into the oil.
                Member, Sons of the American Revolution

                CLICK HERE to see my custom hydraulic roller 390 FE build.

                "We've got to pause and ask ourselves: How much clean air do we need?"
                --Lee Iacocca

                From: Royal Oak, Michigan

                Comment

                • toddgilroy
                  Experienced
                  • Aug 30 2014
                  • 411

                  #9
                  I think I see what you mean, Dave. It seems one of the parts on that end failed (bearing, cone or the retainer) causing the differential case to get out of alignment and grind away. I didn't call it out on the earlier pictures, but you can also see some wear just under the carrier bearing.

                  There were only two small pieces of metal in the oil when I drained it, but I know that someone at some time had serviced the differential because there was only black silicone sealant and no gasket between the axle and carrier housings.

                  Before I took the diff out of the axle housing, I could turn the flange and pinion gear easily by hand, with no noise. I did not drive the car a lot before this, but again heard no noise from the rear end. I am also adding a picture of the diff before I disassembled and cleaned it up.

                  If I replace the bearings and make sure it is reassembled properly, do you foresee any problem continuing to use this differential?

                  Thanks!
                  Attached Files
                  Last edited by toddgilroy; March 2, 2015, 10:21 PM. Reason: Adding more information
                  Todd Gilroy
                  1960 Tbird Convertible
                  Thunderbird Registry #54651

                  Comment

                  • simplyconnected
                    Administrator
                    • May 26 2009
                    • 8787

                    #10
                    Todd, absolutely. As long as your bearings are pressed-in tightly and the bearing surfaces are in good condition, you're good for at least another hundred thousand miles. Just change oil at 50,000.

                    I have no problem with using Permatex Black instead of a gasket. Really, there is no pressure inside your diff. case. Ford used RTV on cast aluminum Escort oil pans in Dearborn Engine Plant, instead of using a gasket. Hey, as long as it works, why not?

                    Apparently, your bearing damage happened before you got ahold of this gear. Every diff I ever changed oil in, I always catch the old oil in a pan and look at it in the sun. They all show little tiny flakes of steel, glistening back at me. If yours was clear, you had new oil.

                    This bears witness to exactly what gets mulched in the gear teeth and in all the bearings. All diff's shed steel. The 'trick' is to change the oil before any damage is realized.

                    Too often, we wait for catastrophic failure before any maintenance is performed. It happens on starter motors, generators, trans fluid, brake fluid... all of it.

                    A brush holder for a modern alternator is $15 including the brushes. Four screws hold it in place just behind the voltage regulator. Generator brushes are $8 and so are starter brushes.

                    Have you priced a starter motor for your car (if one is available)?
                    These are areas where you can really save some big bucks. Take advantage of Rockauto.com and their 5% discount. When a rainy but warm Saturday comes around relax as you PM your favorite cars in your own garage. - Dave
                    Member, Sons of the American Revolution

                    CLICK HERE to see my custom hydraulic roller 390 FE build.

                    "We've got to pause and ask ourselves: How much clean air do we need?"
                    --Lee Iacocca

                    From: Royal Oak, Michigan

                    Comment

                    • toddgilroy
                      Experienced
                      • Aug 30 2014
                      • 411

                      #11
                      I hope I am not the only guy who thinks "Well, now that I have my front end torn out for a complete overhaul, I might as well take the oil pan out for inspection, and maybe the starter, too...and...

                      Well, old tie rods are out so getting to the starter was "easier" and I came across this post from a couple years ago...
                      Originally posted by simplyconnected
                      I agree. Prove your parts to be bad before replacing them, and be sure your electrical connections are solid and clean.

                      Having said that, if your starter motor is original, a little preventive maintenance will save you about $100 down the road. Most folks wait until catastrophic failure which always happens on Sunday (when stores are closed) and far away from your tools. This makes NO sense to me because brushes are about eight bucks and you can change them.

                      There is an inspection plate covering the brushes, held on by one screw. To remove your starter, turn the steering wheel so the tie rods are clear of the starter motor. It's still a tight fit.

                      CLICK HERE to see your starter motor PM'd. All the parts are available at many vendors. - Dave
                      I was expecting to see red conductors but I can't tell if mine are just a different color or really gunked up. This stuff does not come off easily when sprayed with electrical cleaner. Does this stuff need to come off?

                      I will replace the brushes, clean the inside of the housing, clean/strip/paint the outside. Anything else I should be doing on this? This really is a PM because the car starts.

                      There also appears to be some old blue paint on the exterior of the housing so maybe it is not the original stock black starter?
                      Attached Files
                      Todd Gilroy
                      1960 Tbird Convertible
                      Thunderbird Registry #54651

                      Comment

                      • simplyconnected
                        Administrator
                        • May 26 2009
                        • 8787

                        #12
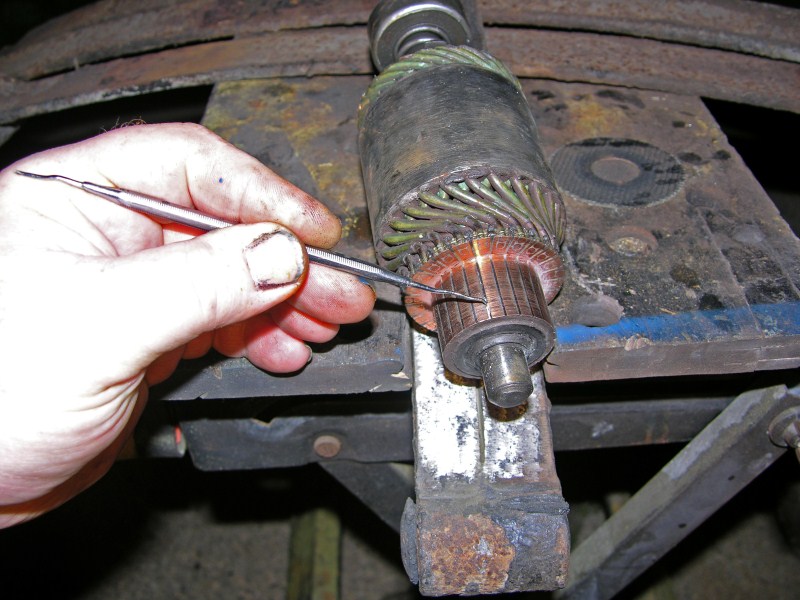
                        Let's talk about your first picture on the LH side. Those heavy wires are pushed into the commutator, soldered, then varnished and baked. Your commutator segments look decent but they need a little help with the insulating micarta separators.

                        The idea is, your brushes need good electrical contact with the commutator segments. If micarta (between the segments ) lifts the brush off the copper, arcing results and erosion happens. Use a small tool to scrape just a little bit of insulation away so the micarta is undercut:

                        When done it should look something like this:


                        Everybody wants to make the commutator segments shiny copper and that's a BIG mistake. Notice in my pictures, black embedded in the copper surfaces. That's from carbon, which is a good conductor and a lubricant. If you take that away unnecessarily, the brushes wear as they try to form a new carbon surface.

                        The commutator segments need to be straight, not dished or tapered to one end. If the commutator needs slight truing, glue some 120 (or finer) sandpaper to a popsicle stick and turn the armature with your drill motor as you LIGHTLY remove some copper. You can hold the other end of the armature in a wooden block held in a vise with a hole drilled in the wood. It's far better to 'under-do' than to 'over-do'. Re-scrape the micarta between segments when done.

                        SECOND & THIRD PICS...

                        Your brush pigtails are squeezed in a (folded over) copper 'J' and then soldered. A big soldering iron will free them, then bend the 'J' out a little to accept your new brushes. Squeeze the new ones in and add solder.

                        It's important you do the connection like this because solder is only supposed to fill in the spaces. The real connection is copper-to-copper.

                        Don't try to take the paint off. I don't care if you use kerosene or diesel fuel to wash the guts out. Harsh chemicals will break down some of the varnish. You only need to get the loose pieces of brush and grease material out. Then, let it sit in the sun to dry it out OR you can use this time to wire brush and paint the outer housing. I used a wire brush on my drill motor. You can see the rust around the electrical post and the shiny metal poking through:

                        Yes, I brushed the back plate (that also holds the brushes). This is tricky because too much paint will stop ground current from flowing between the housing and back plate. I've seen brand new starters that simply wouldn't work because they had too much paint. Half the brush holders are grounded and half are insulated. I used high temp barbeque paint on my starter motor. It's cheap, dries fast and looks great.

                        Finally, THE most important part of this is how your brushes slide in their holders. See how your brushes wore on an angle? That's typical. You want yours to contact the surface evenly and to touch all the way across. I use a hook to pull up on the brush pigtails. They need to slide with ease. Soon enough, garbage will get in there and gum up the operation, so go easy when greasing the bearings.

                        I judge the quality of grease by putting it between my finger and thumb, then I pull them apart. Good grease should produce a long thin string before it 'breaks free'. 'White grease' is crap. Try some of the moly-lithium greases on the market and do the test before you buy. When you're done, your starter motor will be far superior to anything on the market and it should last another 100k miles. - Dave
                        Member, Sons of the American Revolution

                        CLICK HERE to see my custom hydraulic roller 390 FE build.

                        "We've got to pause and ask ourselves: How much clean air do we need?"
                        --Lee Iacocca

                        From: Royal Oak, Michigan

                        Comment

                        Working...
                        😀
                        🥰
                        🤢
                        😎
                        😡
                        👍
                        👎