Announcement

Collapse
No announcement yet.

Rear bumper removal

Collapse
X
 
  • Time
  • Show
Clear All
new posts
  • Guest

    Rear bumper removal

    Thunderchicken60
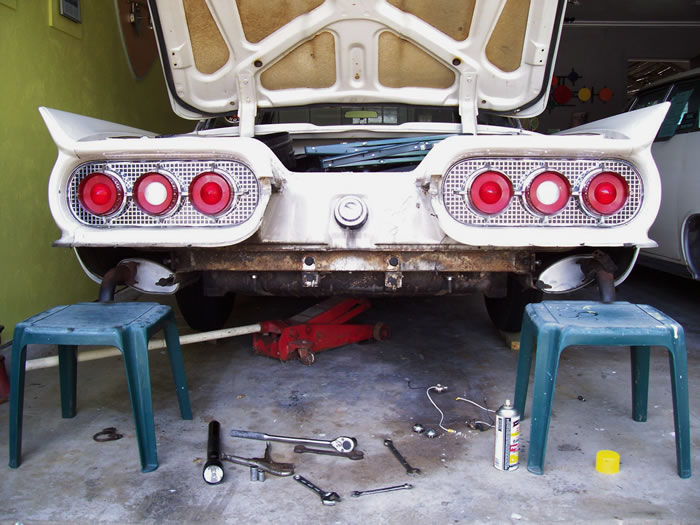
    I did a search (perhaps incorrectly) on how to remove the rear bumper on my 60HT.You probably guessed I was unsuccessful.Can anyone tell me how or where to look for this info.My shop manuel tells how to remove the front but not the rear Thanks George 60HT
  • Guest

    #2
    RE: Rear bumper removal

    I believe their are four LARGE bolts that hold the entire bumper to the car. Soak them and the "caged nut" several days in advance before attempting to extract them. If the car has a lot of rot the nuts may turn inside the "cage" and this can be a problem. After you remove the bolt the nuts can be removed from the top of the cage. The nut is only surrounded on three sides. I replaced mine and covered the threads with anti-ceaze prior to installation. The bumper will come off in one piece.
    Good Luck.

    Comment

    • Alexander
      Webmaster
      • Oct 30 2002
      • 3321

      #3
      RE: Rear bumper removal

      It is in the 1958 Technical manual in the Technical section of the main site:


      Alexander
      1959 Hardtop
      1960 Golde Top
      Alexander
      1959 Hard Top
      1960 Golde Top
      sigpic

      Comment

      • Guest

        #4
        RE: Rear bumper removal

        Oh yeah... I did it by memory and I forgot about those two smaller brackets in the center.

        Comment

        • Guest

          #5
          RE: Rear bumper removal

          TC60,
          I removed mine for replating recently. Without all of the details, since I did not write down my exact steps, I still can tell you the basics.

          First:
          1. The bumper comes off WITH all of it's brackets in place on the
          bumper as a unit.
          2. All of the attachment bolts are accessable from under the car.
          3. Spray Penitrating oil on the the attachment bolts.
          4. There are 8 attach bolts to be removed. 4 per side.
          5. Removal might be a little easier than reinstallation due to the
          tight designed fit of the 2 bullet part of the bumper and changes
          position of everything including brackets and maybe bumper if it
          has been straightened before installation. I had to slightly
          bend the flanges on the lower tail light cove housing that fits
          under the top edge of the bumper.

          Removal:
          Remove the license plate light bulb socket from the chrome/lens part on the bumper.

          Remove the left and right attachment hanger bracket that supports the tail pipe. If it is rusted bad, you can try to remove the U-Bolt around the tail pipe and leave the hanger in place on the bumper bracket.

          Prepare to have something to be used as a support for when the last bolts are removes so that the bumper can "drop" onto something. I did this job by myself and used two plastic patio end tables with maybe a 2x4 or 1x4 or whatever is needed to get it close to the bottom of the bumper. It is a heavy and complicated bumper. 5 sections and 8 brackets.

          Note:
          Locating the bracket bolts.
          Ther are visable round SS covered carrage bolts on the rear of the lower section of the bumper as viewed from the rear. You will see two that are close to and under the license plate area. There are also two (one above the other) on the lower section of each side of the bumper that are about in line with the center tail light lens. These 4 locations line up with the locations behind the bumper of the attachment bolts under the car that you will be removing.

          The location under the license plate has two small L shaped brackets (one on the left and one on the right). Two bolts on each of these brackets attaches these bumper/brackets to the car. The lower one (per side) has a removable nut. The upper one (per side) has a hidden captive nut.

          The two locations under the center tail light lenses on each side of the car has two bolts each to be removed. On each side, one bolt (twards the front of the car) is very long and goes through the hollow square sub-frame and the other goes through a solid steel bracket welded to the end of that sub-frame. Those bolts are short. These two bolts (per side) hold on two sandwitched together brackets (per side). Note: The long bolts may be a little hard to get on/off due to clearance of the square nuts that are very close to the gas tank. True for both sides. Also, when reinstalling, these sandwitched together brackets (left and right side) might have become a little too close together and will not fit on the outside of the sub-frames. You may need to pry them over the sub-frames.

          When the 8 attachment bolts are removed, the bumper should be able to be pulled away from the car body. It is a close fit and you may have to tug, pull and shimmy on the bumper to get it to release. Also, the little rubber "fillers" between the two bumper bullets and tail light cove bezel are attached with a screw as I recall. You might remove it with the bumper, so remove the screws.

          Two people working on this is easier, but as I said, I did it by myself and I weigh only around 155 lbs. and am 5'-9" tall.

          Once removed, take photos of the brackets attached to the bumper from several angles and make sure that you understand the assembly. Then disassemble the brackets from the bumper. Then remove the license plate frame and rubber stop.

          This may not be perfect, but it should help. If I figure out how to post the photos as per Alexander's instructions, I will. Otherwise, I will see if he does not mind posting them. I took photos as I mentions after the removal and before installation (in which everything is nicely painted and you can see it better). I may try to take a photo under the car, because I painted the brackets black and the bolts silver, so that stand out from the rest of the under carriage.

          If you have questions, let me know.


          Comment

          • Guest

            #6
            RE: Rear bumper removal

            When I took mine off it had shims in it for alignement. I attempted mark the position of the brackets, and I took photos of the shims and how many were in each spot.

            Comment

            • Guest

              #7
              RE: Rear bumper removal

              I forgot to mention the shims. I had some also. Hard to hold them in place when reinstalling the bumper. I did the job by myself. So, I left mine out and it lines up better now than before. One thing for sure, if you need to go back and forth with shims, installation/removal/installation/removal - you will have a much longer time involved. I tried without first and thankfully, the bumper fits the car very straight (maybe not perfect perfect, but good). Some shims, as I recall are between the bumper and the brackets. Those are easy, unless you have to remove to bumper to change them. Some are so thin, it can't help much even when leveraged out in distance. I sent my photos in to Alexander, since I am a little pressed for time. They will show the brackets very well.

              Comment

              • Alexander
                Webmaster
                • Oct 30 2002
                • 3321

                #8
                RE: Rear bumper removal

                Here is one photo of several that GWP sent me of the rear bumper. Thanks.


                Alexander
                1959 Hardtop
                1960 Golde Top
                Alexander
                1959 Hard Top
                1960 Golde Top
                sigpic

                Comment

                • Guest

                  #9
                  RE: Rear bumper removal

                  If you need to see the photos of the bumper/brackets on/off the car, email me and I will send them to you.

                  Comment

                  • Guest

                    #10
                    RE: Rear bumper removal

                    Thunderchicken60
                    Thanks all for the good info,I finally got it off but what a job it was and I am not looking forward to putting it back on.On all the long bolts the cages on the instead of the frame where missing,so I had to loosen the fuel tank to move it around so I could get a wrench on them.I as did Bill did the job alone,I think I will have to buy a couple cases of beer and get some neighbors to help me put it back on.George 60HT

                    Comment

                    • mrfreeze
                      Newbie
                      • May 16 2007
                      • 13

                      #11
                      Caged nuts?

                      On the caged square nuts, how do you get them out if they turn inside the cage? I got them to loosen a bit, but then they both turned, and I can't stop them from turning. I tried wedging some thick shims alongside the nut to hold it in place, but that didn't really work, and with the cage and location, it seems impossible to get anything on them to hold them in place, or even to weld the nuts to the car so they can't turn.

                      I need to get the rear bumper off before I can have my patch panels installed, and I need to get the front bumper off before I can have my engine compartment painted, and there are 2 bolts on the front and 2 on the rear that are giving me trouble. Rounded the nut on on of the bolts up front going through the frame rail, and the other goes through the radiator support and it's impossible to get an impact wrench on either side, and I wasn't able to get enough leverage or force with a wrench and a breaker bar to do anything with it. Tried a nut splitter, which ruined the nut for all intents and purposes, but failed to finish the job. I've resorted to grinding the head off the bolt through the frame rail, it's a slow process, but it will get the job done. Unfortunately, that method isn't even an option for the other 3 bolts.

                      Comment

                      Working...
                      😀
                      🥰
                      🤢
                      😎
                      😡
                      👍
                      👎