Announcement

Collapse
No announcement yet.

Brake Booster

Collapse
X
 
  • Time
  • Show
Clear All
new posts
  • stubbie
    Experienced
    • Jul 7 2011
    • 299

    Brake Booster

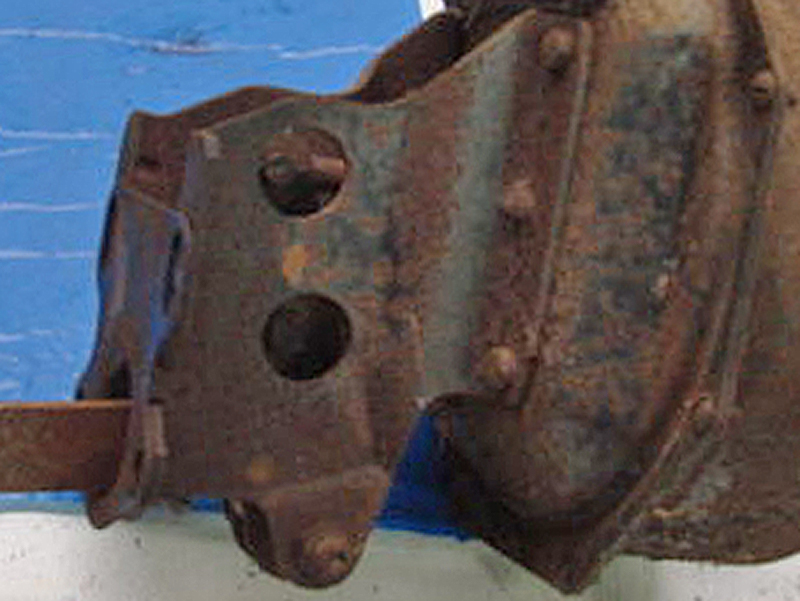
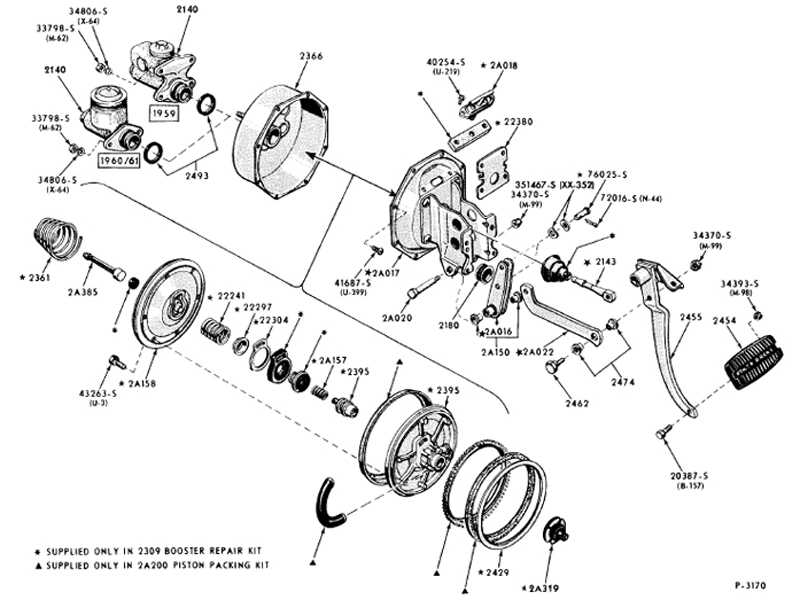
    Decide I had better look at a brake problem that I have had since last year (don't want to be to hasty). After removing the master cylinder I found that the booster unit was full of brake fluid so I started to remove it. It says in the manual to remove the 4 bracket to dash panel retaining nuts and washers. Are these the same nuts that are holding the rear of the pedal support bracket and what is the best way to remove them and put them back afterwards?

    Cheers
    Phil
  • simplyconnected
    Administrator
    • May 26 2009
    • 8787

    #2
    Yes. Those are 'cage nuts' attached to your brake pedal support inside, and they don't need to be removed.

    I see where the manual is headed... Some fasteners are studs with nuts in the engine compartment. Other fasteners used were bolts that went through the firewall, into the brake pedal support.

    Either way, cage nuts were used on the brake pedal support. Some of these nuts have two 'ears'. When squeezed, they simply fall out of the square hole they are in. Sometimes it's a pain to squeeze them and put them back in. Sometimes they get lost, and you end up with a big square hole.

    Carefully, loosen the bolts or nuts at the firewall bracket, so you don't disturb the nuts inside. The nuts should stay in place, making this job a whole lot easier. - Dave
    Member, Sons of the American Revolution

    CLICK HERE to see my custom hydraulic roller 390 FE build.

    "We've got to pause and ask ourselves: How much clean air do we need?"
    --Lee Iacocca

    From: Royal Oak, Michigan

    Comment

    • stubbie
      Experienced
      • Jul 7 2011
      • 299

      #3
      Hi Dave

      Sorry I'm going to sound a bit blond here. The bolts that go through the firewall dont have any heads on the outside in the engine bay they are flat. They go through the firewall under the dash and also go through the pedal box support with nuts on the inside.
      Your saying not to remove those nuts and to remove the nuts from the braket directly behind the booster in the engine bay?
      Ok I have done that but I can't seem to be able to pull the booster away from the bracket. I have disconnected the pedal arm from the inside. God nows were that clip went it flew of at a rate of knots?

      Cheers

      Comment

      • simplyconnected
        Administrator
        • May 26 2009
        • 8787

        #4
        Here's a picture of a nasty OEM booster for a Squarebird:

        Notice that the bracket is RIVETED to the booster (in four places). When we convert to modern boosters, we carefully grind those rivets off and reuse the firewall bracket, and all the hardware all the way back to the brake pedal.

        I have another picture, but it doesn't show the inside Brake Pedal Support Bracket:

        If you have round head screws on the engine side of the firewall, the original bolts have been replaced.

        It's really no big deal, but originally, the inside Brake Pedal Support Bracket had cage nuts that rattled around on the square bolt holes. When the bolts were drawn tight, the cage nuts were 'solid'. As I mentioned, you either had threaded studs in those nuts or a 3/8" fine-thread bolt in each of the four holes. Fine thread bolts may be a challenge to find as a replacement, so they probably used 'whatever'. If you have the luxury of another helper, holding the nuts inside while turning bolts from the outside, that will work. In 'production' operations, one guy did it all, which is why the cage nuts.

        The firewall bracket has what I call, a pivot link/arm (2A150 in the picture). A bolt holds it at the bottom, a clevis pin holds the brake pedal rod to the center, and another clevis pin connects the top of the link to the booster rod. These clevis pins should be standard 3/8" diameter with a spring clip going through the ends of the pins. The large holes on the sides of the firewall bracket are there for easy access to the clevis pins.

        Once the rivets are removed, this firewall bracket will work nicely with modern two-stage 8" boosters (and dual piston master cylinders). A few of our members have done this conversion and we have pictures. - Dave
        Member, Sons of the American Revolution

        CLICK HERE to see my custom hydraulic roller 390 FE build.

        "We've got to pause and ask ourselves: How much clean air do we need?"
        --Lee Iacocca

        From: Royal Oak, Michigan

        Comment

        • stubbie
          Experienced
          • Jul 7 2011
          • 299

          #5
          Thanks Dave I've removed it. For some reason I was thinking the pedal arm came straight out to the booster. Good job I looked at that diagram you sent, duh.
          Yes I have a new dual brake master cylinder from a 67-70 Mustang. I'll let you know how I go and take some pics.
          Cheers

          Comment

          • simplyconnected
            Administrator
            • May 26 2009
            • 8787

            #6
            Phil, if your Squarebird came with this booster and firewall bracket, you are very lucky. To find or make another to replace it can hardly be done for under US$50. I have never seen a firewall bracket riveted to the booster on any other car.

            So with the addition of a one-to-two inch spacer, you can grind off your old booster and mount a new modern booster, re-using all the original parts from the firewall bracket back to the brake pedal. That's huge; it saves a lot of work already done by Ford. Notice, there is a brake pedal adjustment at the brake pedal bolt. It has an offset 'snail cam' type of adjustment when you turn the bolt.

            There is another very important adjustment (covered in the Shop Manual) between the booster and the master cylinder. All boosters have this adjustment 'jack screw' with a jam nut. It cannot be seen when the booster and master are assembled so the only way to measure this clearance is by putting the parts together with some clay, Play-Dough, or (don't laugh) a piece of **processed cheese. When the pedal is at rest, there should be NO slop. Just as important, there should be NO pressure. Properly set up, the jack screw should come up to, but not push on, the master cylinder's piston.

            **Over here in the US, we call it "American Cheese". One mile across the Detroit river in Canada, they call it, "Canadian Cheese". I don't care what it's called, it's what I want on my cheeseburgers. Sometimes I buy it with a wrapper on each slice. When using it for measuring, I leave the wrapper on and I cut off a small square. Try not to leave it in your brake parts after you're done. - Dave
            Member, Sons of the American Revolution

            CLICK HERE to see my custom hydraulic roller 390 FE build.

            "We've got to pause and ask ourselves: How much clean air do we need?"
            --Lee Iacocca

            From: Royal Oak, Michigan

            Comment

            • OZZY Stewie
              Newbie
              • Nov 15 2014
              • 2

              #7
              Hi stubbie and Phil,
              I am going down the same path with dual MC.
              Phil can you send photo's please from your club on how they did it. I can get a Mustang MC in Australia but the booster is a problem. You mentioned fitting bracket to new/modern dual booster. I need to know what type.
              I have even heard Toyota will fit but need to know type.
              Any help from you two would be great.
              Regards, Stewie

              Comment

              • stubbie
                Experienced
                • Jul 7 2011
                • 299

                #8
                Hi stewie

                I'm one and the same. I haven't gotten around to reinstalling my booster and mc as yet unfortunately I have been really busy making a dollar for my employer. I'm using a 67-70 Mustang mc and I had my booster rebuilt by Terry at Hydroboost in Victoria. Luckily he had a kit to fit my booster sitting on his shelf otherwise he was going to arrange something to fit. I had spoken to a guy on the American Fords Forum and he said that he is using a booster from a Nissan and it works really well but he doesn't know which one and the guy who did the work for him had retired and couldn't find out. So thats all the info I have. If you want to speak to Terry at Hydroboost here is his email address below. He is probably the best person to speak to. He is quite knowledgable and is very helpfull. I think you could possibly use a Ford Xbc master and Nissan booster also.

                Cheers Phil
                mailto:hydroboost@bigpond.com
                Last edited by stubbie; November 16, 2014, 07:46 PM.

                Comment

                • OZZY Stewie
                  Newbie
                  • Nov 15 2014
                  • 2

                  #9
                  Booster

                  Hi Phil,
                  Realized after post you are one and the same. I was after Dave as he said he had photos of the M/C installations from his club members. I have taken photos to send to Terry in Victoria and see what he comes up with for the booster. Do you have drum/drum brakes? I am confused about which MC to use as some say 67-70 and others 73 Mustang. Are you using a proportioning valve? If so what type?
                  All wheel brakes done on our girl, just MC/Booster to go.
                  After 6 years all electrical done after PO butchered 80% of the wiring. She's turn key now and a pleasure to drive.

                  Regards, Stewie (and talking jobs,about to be made redundant.maybe)

                  Comment

                  • stubbie
                    Experienced
                    • Jul 7 2011
                    • 299

                    #10
                    Hi Stewie
                    I have drum brakes and am using 67-70 Mustang. I did buy a valve but I don't think I will need it. Look at the the links below. One is for disks brakes but might be usefull. The other i think is for a mercury but has some good info. Also added a link for valve if you think you need one. I was hoping to have mine roadworthy in December but i'm still waiting for parts to arrive from the US. Hopefully soon.

                    Cheers

                    This Forum is for the discussion of adding a dual Master Cylinder, Dual 8" Power Booster, and Power Front Disc Brakes to the 1958, 1959 and 1960 Squarebird.


                    Check out the deal on 5 port Drum/Drum Brake Proportioning Valve w/ Wire Sensor Plug at Carolina Classic Trucks, Inc.

                    Comment

                    • simplyconnected
                      Administrator
                      • May 26 2009
                      • 8787

                      #11
                      Somebody forgot to pay their internet bill...

                      Carolina Classic Trucks is currently suspended. If you are the owner, please login to your administrative console or contact our customer service team.

                      Too bad because I want to check their prices.
                      Member, Sons of the American Revolution

                      CLICK HERE to see my custom hydraulic roller 390 FE build.

                      "We've got to pause and ask ourselves: How much clean air do we need?"
                      --Lee Iacocca

                      From: Royal Oak, Michigan

                      Comment

                      • stubbie
                        Experienced
                        • Jul 7 2011
                        • 299

                        #12
                        Here is the one I linked to Dave

                        5 port Drum/Drum Brake Proportioning Valve w/ Wire Sensor Plug drum-drum-brake-valve
                        Manufacturer: Carolina Classic Trucks
                        Part Number: drum-drum-brake-valve
                        Rating: Not yet rated


                        Our Price: $88.88

                        Comment

                        • simplyconnected
                          Administrator
                          • May 26 2009
                          • 8787

                          #13
                          What you need to know is, drum/drum and disk/disk BOTH have no proportioning. In other words there is no difference in pressure between the front and rear brake lines.

                          There IS however, a need for a spool between the two systems, in every split system in case one line ruptures. If that happens, the spool will be shifted to the side of the rupture, cutting off any brake fluid leaking. Also, the switch grounds when the spool shifts to either side, completing a power path through your warning light (or LED).

                          The combination valve also meters, sending fluid to your rear system first, then to the front with equal pressure. Think of your wheels being on wet leaves or sand. You want the rear brakes to energize first so the front can steer.

                          With the original system, all plumbing equalized pressure at the junction block. If a wheel was more out of adjustment, pressure didn't develop until all shoes were touching the drums. Remember, 'pressure' is resistance to flow. When you split the system, one side may need more fluid than the other so the proportioning valve spool compensates for that difference.

                          If you don't use a combination valve to hydraulically tie the front to the rear systems, the first shoes to engage the drums will control the system, and the 'other' shoes will never touch the drums because the M/C has two identical but separate pistons on the same shaft, both the same diameter. If you think shoes naturally pull to one side, running with no valve will make it more severe. - Dave
                          Member, Sons of the American Revolution

                          CLICK HERE to see my custom hydraulic roller 390 FE build.

                          "We've got to pause and ask ourselves: How much clean air do we need?"
                          --Lee Iacocca

                          From: Royal Oak, Michigan

                          Comment

                          • stubbie
                            Experienced
                            • Jul 7 2011
                            • 299

                            #14
                            Brakes

                            Can someone tell me where I'm going wrong with the install of my recond brake booster and master cylinder on my 64 Tbird. I have installed brake booster to bell crank. Attatched pivot etc. I have bled the master cylinder on the bench before I installed it. Connected all brake pipes and warning light. What seems to be happening is that the rod from the booster isn't retracting from the master cylinder when the pedal is let go. Is there something else I should be doing?

                            Thanks

                            Comment

                            • simplyconnected
                              Administrator
                              • May 26 2009
                              • 8787

                              #15
                              Phil, give me more info...
                              How deep was the hole in your M/C? Did it come with a spacer (puck)?
                              Did you adjust the booster output rod?
                              Do you get any brakes or does the pedal sink to the floor?

                              How did you adjust the mechanical linkage?

                              All this can be tested individually by disconnecting the bolts (not the lines) on the M/C, and trying your pedal. If you find binding, go back toward the pedal even farther.

                              The pedal rod should have very little slop when the pedal is at rest. The booster output rod should barely touch the piston in your M/C. If any of these rods keep the piston pushed in at all, your brake lines cannot 'reset' to zero pressure because in the 'at rest' position, your M/C ports are all open from the reservoirs to the lines (so the shoe springs can retract and push the oil back).

                              If you truly have a sticky piston, you need to disassemble the M/C and clean the bore until it's smooth. Don't forget the return spring in there. - Dave
                              Member, Sons of the American Revolution

                              CLICK HERE to see my custom hydraulic roller 390 FE build.

                              "We've got to pause and ask ourselves: How much clean air do we need?"
                              --Lee Iacocca

                              From: Royal Oak, Michigan

                              Comment

                              Working...
                              😀
                              🥰
                              🤢
                              😎
                              😡
                              👍
                              👎