Announcement

Collapse
No announcement yet.

New coil springs

Collapse
X
 
  • Time
  • Show
Clear All
new posts
  • deviot
    Apprentice
    • Aug 1 2013
    • 58

    New coil springs

    Hi all,
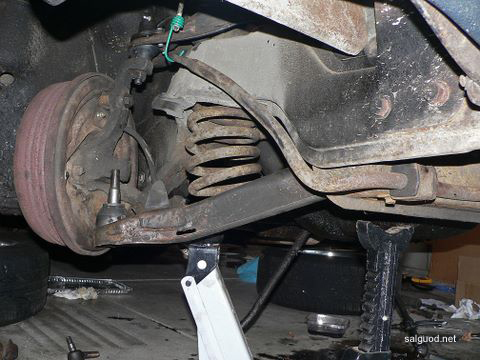
    I just purchased a pair of new front coil springs from thunderbirdhq. The old coils had been cut by the previous owner making the car too low and also lop sided.

    In reading the manual I should be able to push the lower wishbone with my foot and hook the spring on and then lift it back up the the jack. The spring appears to be far too tall to do this.

    I was looking an using the coil spring compressors on the inside of the coil but I don't think I'll be able to undo them to take them out again. If I put them on the outside of the coil I don't think then will fit up in the frame.

    I'm wondering if the coils are make to the original specs.

    Has anyone had experience with this?

    Thanks

    Dave
    sigpicHello from Australia
  • Fireball
    Apprentice
    • Nov 17 2012
    • 55

    #2
    If my memory serves correctly, some years need a special tool and some can be done with regular compressors. Try searching the forums it must have been discussed here.
    Last edited by Fireball; January 5, 2014, 08:18 AM.

    Comment

    • Dakota Boy
      Super-Experienced
      • Jun 30 2009
      • 1561

      #3
      The front of the car has to be jacked up pretty high first; so the lower control arm can be pushed downwards far enough. Also, remove the UPPER control arm bumper (this allows the spindle to drop a few more inches, and makes it a bit easier to get the lower control arm's ball joint into the spindle.

      No spring compressors are needed. I did the job myself a few winters ago. It was fairly nerve-wracking, but I followed the Ford manual's instructions, and found good information (as always) right here on this site.

      Another member (dgs) here had posted some photos of the job:

      Last edited by Dakota Boy; January 5, 2014, 10:24 AM.
      http://www.tbirdregistry.com/viewdat...ryNumber=33517

      Comment

      • simplyconnected
        Administrator
        • May 26 2009
        • 8787

        #4
        If you are going in as deep as 'replacing springs', save some money and a lot of labor by doing all your maintenance at once. You will be so glad you did after it's over.

        Don't even try spring compressors, they're useless on a Squarebird.

        These "A" arms are very long. That makes them good, stable levers. Think of them as such, and think about how much room you will need to let them swing down before the spring drops out. It literally drops out, into your lap.

        I put my cars up on solid jack stands, with frame members perched on them spread as far apart as possible to give the most stability.

        Before going under your car, give it a good shake. Make sure it is solid.

        Remove the shocks and stabilizer hardware. I have a scissors jack that fits nicely under the lower ball joint, but for now, use it as a 'safety' backup with a small gap. I loosen the nut but leave it on about even with the stud. Then, give it a good rap with my small sledge hammer. (There are several ways to separate a ball joint.) The spring will 'help' separate the ball joint and the nut will contain it as the jack underneath is an added safety measure.

        Once loose, raise the scissors jack to take pressure off the nut. Unscrew the nut all the way and lower the scissors jack. The 'A' arm will descend, eventually offering the spring under no pressure.

        At this point, I sincerely hope you change all your bushings (US$8.00 each) and change your front stabilizer bar to one that is 1-1/8" in diameter.

        Take LOTS of pictures as you go. Remember which shims go where. I use a metal stamp to show where, for example, the 'LF' pivot shaft goes. That way I know which side it's from, witch end is up and which end goes forward. On some cars this doesn't matter, but it did on my '55 because one end was slightly longer than the other.

        If the ball joints are worn, they are removed and replaced much easier on your bench than on the car. Some of our members stripped and powder coated their "A" arms, making them look brand new.

        New spring installation is exactly opposite. Tape the rubber biscuit on top (I use electrical tape). Rotate until the spring's bottom end rests in the pocket, then raise it with a scissors jack until the lower ball joint enters the spindle. If the car raises off your jack stand, put your wife on the fender and it will come back down enough to turn the ball joint nut.

        If you're doing the stabilizer (sway)bar, 'fish it in' just before you connect the last ball joint on the last side because it goes through your 'A' arms.

        One last important note: Do not tighten your new rubber bushings until the car is 'sitting' level. Tightening in any other position will hyper rotate the urethane and cause it to fail early. You will notice, as you take the old bushings out, the car does not rotate on the shafts, in fact the bushings' center sleeves have teeth to hold them in position. It strictly rotates on urethane. - Dave
        Member, Sons of the American Revolution

        CLICK HERE to see my custom hydraulic roller 390 FE build.

        "We've got to pause and ask ourselves: How much clean air do we need?"
        --Lee Iacocca

        From: Royal Oak, Michigan

        Comment

        • dgs
          Super-Experienced
          • Feb 13 2003
          • 962

          #5
          If you don't have a factory shop manual, get one. All the parts houses stock reprints. It gives directions on removing the spring with a floor jack. Sounds silly, but works great.

          I didn't believe it and tried to use an auto parts store spring compressor and as Simply Connected said, it was useless. No room to get it in the spring.

          Check out my gallery lined above for some pics. Unfortunately none of getting the spring out as I was more worried about controlling the spring instead of taking pics.

          The manual also tells the dimension of stock springs. I remember there were two lengths, I believe the longer one was for the 430 cars but I'm not sure. Some members have posted that replacement springs made their nose too high. Measure them and compare against the factory specs.

          My car had the shorter springs with yellow paint markings that were spec'd to be 15 3/4" long. They measured exactly that when i pulled them out so I put the originals right back in.
          DGS (aka salguod)
          1960 Convertible - Raven Black, Red leather
          www.salguod.net

          Comment

          Working...
          😀
          🥰
          🤢
          😎
          😡
          👍
          👎