 Tweet
Tweet
I will have to replace the differential pinion seal on my Bird. The manual calls for removing the pinion bearing retainer and then, with a special tool, to remove the U-joint flange nut. Would it be save to remove the U-joint flange nut while the unit is still installed in the differential and using the friction of the wheels with the ground to loosen the nut, or could this cause damage to the gears? Any good tip on how to remove the U-joint flange?
-
sigpicFrank
1958 T-Bird "Trov�o Rosa" - "Rose Thunder"
Thunderbird registry #61670 -
This nut is no joke. It requires the highest torque of the whole vehicle.
Transmission and Gear shops use a very LONG bar that goes over the U-joint flange like a box, after the driveshaft is removed, while the socket works the nut inside. So, the long bar and the socket work together and against each other. No torque goes to the wheels. Most of these long bars (that I have seen) are hand-made because they are nothing technical. I suppose you could use a huge pipe wrench (with a pipe on the handle) instead but the bar won't slip off.
Once the nut is off, the yoke should slip off the spline, revealing the seal. The seal is easy to remove at this point.
Tightening the yoke nut can be tricky because it controls a 'crush washer' inside, which determines how far the pinion gear meshes with the ring gear. So before you start, mark your nut and pinion with a punch. Take lots of pictures. When finished replacing the seal tighten the nut, matching the punch marks. If you tighten too much, the pinion gear will come out of the ring gear.
This job is easier if your car is on a hoist, in the air. It can be done using ramps but that long bar needs room. Jack stands under the sub-frame work much better than ramps because the rear axle suspends, lowering the banjo for easier access. - DaveMember, Sons of the American Revolution
CLICK HERE to see my custom hydraulic roller 390 FE build.
"We've got to pause and ask ourselves: How much clean air do we need?"
--Lee Iacocca
From: Royal Oak, Michigan -
Dave, would he be better off by removing the ge****t from the car and taking it to a shop to put a new seal in?Comment
-
There are certain jobs that I leave to the guys that have a lift. That is one of them. It's not a very expensive job to have done by a shop. I think I paid $75 USD to have the last one done. It took less than an hour. Since the seal is only a few bucks it's well worth it. Just make sure you get the correct seal. However if you enjoy working on your car on jack stands be my guest.
JohnJohn Pizzi - Squarebirds Administrator
Thunderbird Registry #36223
jopizz@squarebirds.org 856-779-9695
https://www.squarebirds.org/picture_gallery/TechnicalResourceLibrary/trl.htmComment
-
There is a lot to what John is suggesting. The pro's have all the tools, they can do this job fast and they should offer some kind of warranty BUT...
I've done this work in my driveway when I didn't have $75. No, I would not separate the diff if you're sure the guts are clean. The seal is very inexpensive and easy to install.
Here's another facet... Time is money. In order for the pro's to make money they must work fast. They will do exactly what is necessary, cutting corners whenever they can. That's why I love doing my own work. I would take my time and do a complete and thorough job, including washing out the insides and replacing gear lube with good oil. At the end, I know exactly what has been done, what materials were used, etc. I always buy the best brands to help ensure longevity. The pro's buy whatever will get the job past the warranty period. <--This is a sore spot with me. If I hire someone to do work I expect he should make a profit so I always ask for better parts with the understanding that I will gladly pay the difference. Sometimes I supply the parts, just to make sure. While under there, I would poke around, looking for trouble before it happens. - Dave
CLICK HERE to see my custom hydraulic roller 390 FE build.
"We've got to pause and ask ourselves: How much clean air do we need?"
--Lee Iacocca
From: Royal Oak, MichiganComment
-
John Pizzi - Squarebirds Administrator
Thunderbird Registry #36223
jopizz@squarebirds.org 856-779-9695
https://www.squarebirds.org/picture_gallery/TechnicalResourceLibrary/trl.htmComment
-
I just done this. I changed out the pumpkin in my rear end, and installed a new pinion seal at that time. It's not that bad of a job. Like Dave said, use a punch to mark things. The nut, the pinion shaft, and even the flange. Then mark it with white marker. I used a big adjustable wrench to hold the flange, and a socket and breaker bar on the nut. I also used an inch pound dial type torque wrench to check how much torque it took to turn the pinion, before and after the replacement. With your marks, count the. Number of turns it takes to remove the nut. And go back exactly that amount of turns to tighten the nut. The torque it takes to turn the shaft, and this procedure is in the shop manual. Also some good videos on u tube. Almost forgot. Ordered all my parts from Rock Auto. Did a few more things while I had the car up on stands, but I'm getting ready to leave on motorcycle trip. So I'll save that till next week.Comment
-
Thanks everybody for the reply�s. I have bad experiences with mechanics overhere, so i prefer to do all work myself. It is also a hobby of me, so even if it is difficult, it will be a challenge to me . I only prefer not to make the same mistakes others had made before, so try to be prepared as good as possible. I already have the seal (from Rockauto), but also will open up the differential to inspect the pinion and ring gear. I have some whine coming from the diff, and just want to see if there is no excessive wear to the gears and if the contact pattern is on the right spot.
sigpicFrank
. I only prefer not to make the same mistakes others had made before, so try to be prepared as good as possible. I already have the seal (from Rockauto), but also will open up the differential to inspect the pinion and ring gear. I have some whine coming from the diff, and just want to see if there is no excessive wear to the gears and if the contact pattern is on the right spot.
sigpicFrank
1958 T-Bird "Trov�o Rosa" - "Rose Thunder"
Thunderbird registry #61670Comment
-
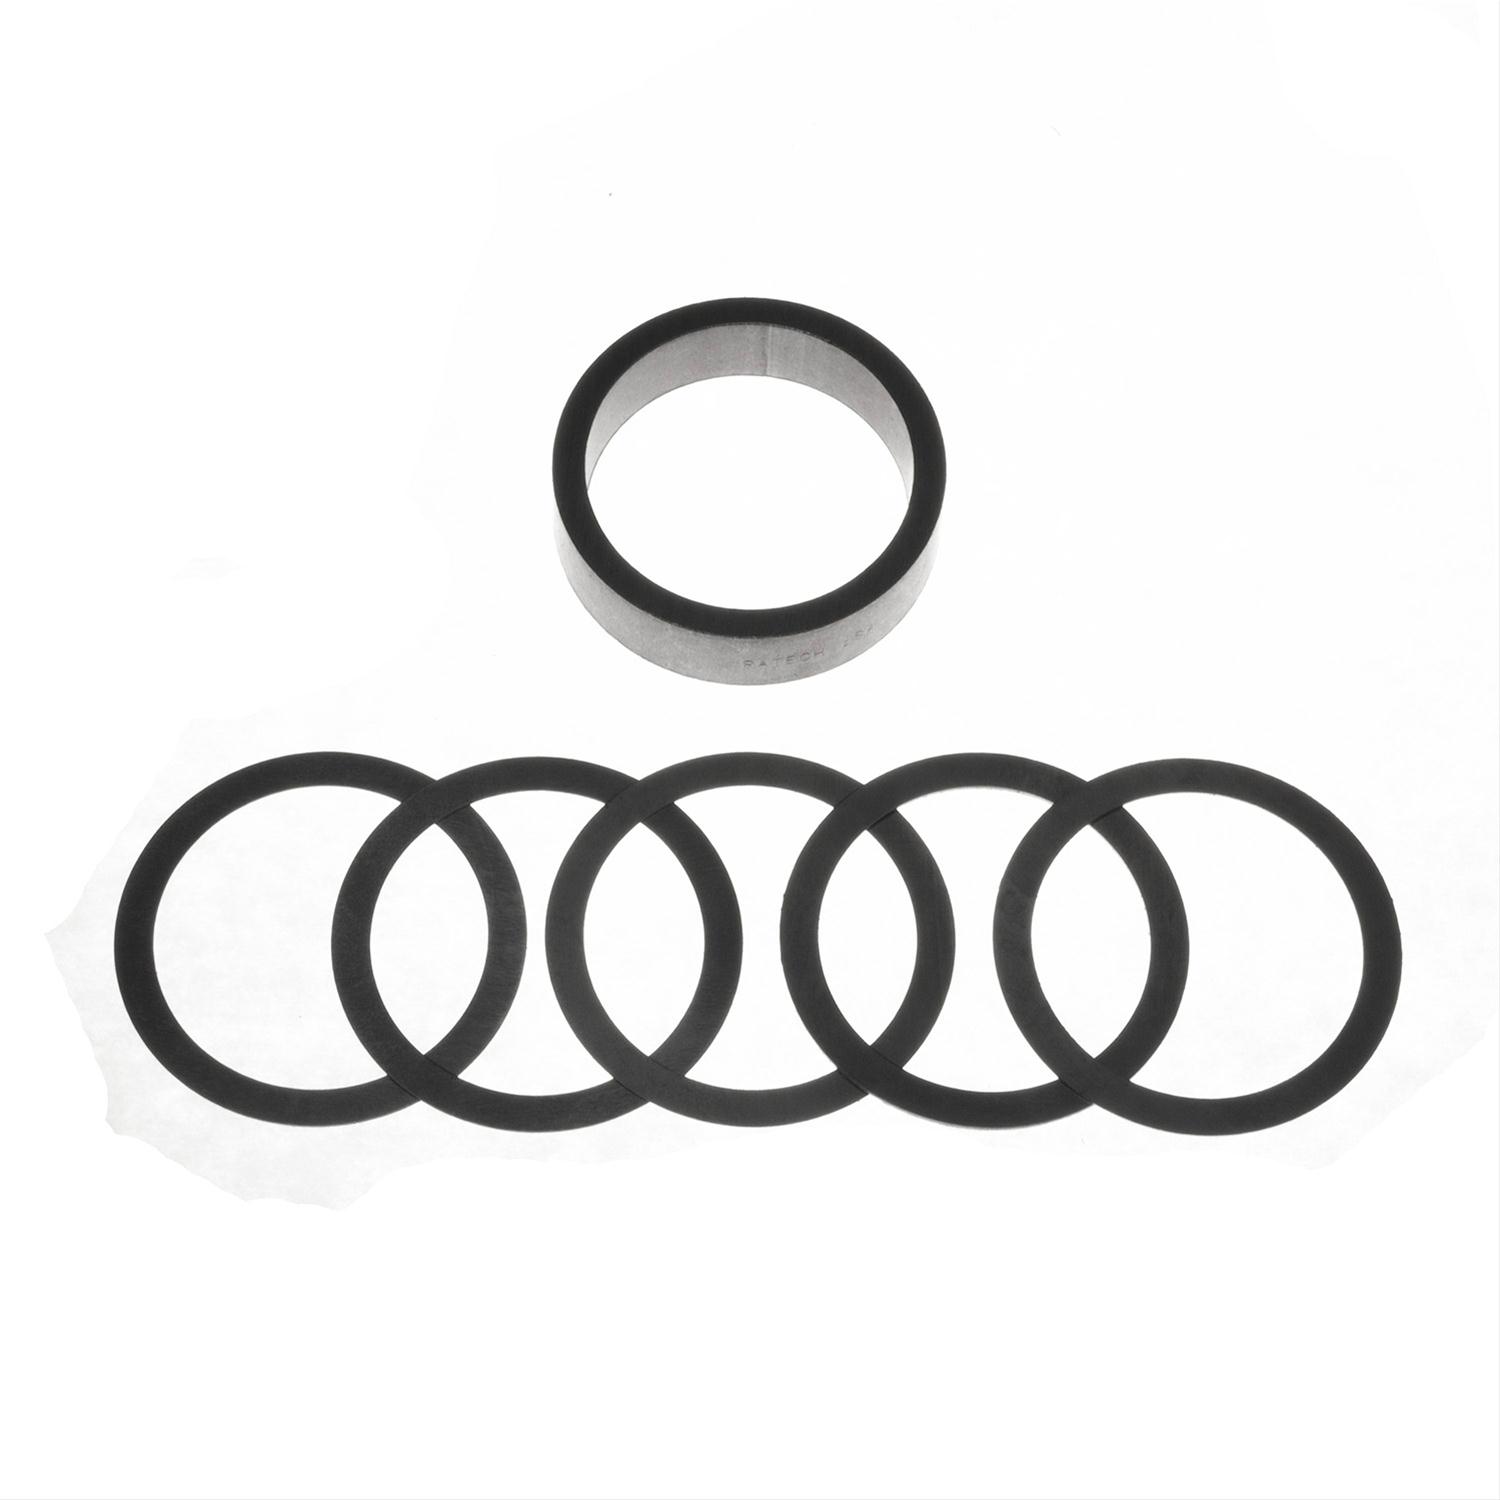
I use the solid spacer kit on my 9's and 8.8's.
This is the way dana diff's are set up from the factory.
Once you get it set up the first time, you can change pinion
seals all day long and never have to mess with a crush sleeve
ever again.
Essentially you use old nut with varying sets of shims until you get
pre-load you need. Then do final assembly with new pinion nut.
Ideally I think it is 20-25 inch lbs with new bearings and no seal
(with pinion assembly on a bench).
59-430-HTComment
-
Ok; I'am going to try again, at posting hopefully useful and reasonably accurate information to be of aid to others here.
I applaud all who endeavor to work on their own vehicle, but, rear differentials can be somewhat of a challenge, as this component requires "feel" and observation based on experience to conclude a proper "set-up".
IMPORTANT: Study your manual concerning this unit carefully, follow the procedures faithfully, or else failure is eminent!
"Proper" procedure for replacing the pinion seal in this unit (9 inch Ford) requires the removal of the pinion support assembly, (bench repair). Note pinion gear to ring gear tooth relationship upon disassembly (mark for reassembly) as some of the earlier units were of the "hunting" vs "non hunting" ring & pinion configuration. Retain the steel shim between pinion support & housing, as this is not a "shim-gasket" for sealing, but rather the "depth-shim"(of which there are many thickness dimensions) which controls the depth relationship between the ring & pinion set (critical!). The crush sleeve has nothing to due with the "pinion depth" as the pinion gear head is bottomed against the inner bearing & support housing. Rotation (tightening) of the pinion nut moves the flange/yoke & outer bearing assy. (the sliding units, crushing the sleeve) closer to the pinion head .
Upon removal of the pinion nut, not always does the flange/yoke just slide off; It may require significant force at times, due to damaged splines or corrosion.
Also, be aware, the "crush" sleeve is never supposed to be reused, but rather replaced any time the pinion nut is removed or over torqued (refer to manual). Its' responsibility is to apply preload and counter forcing seating pressure to the inner races of the two pinion bearings so as to resist their turning in service, and provides tension for the pinion nut. This is accomplished with your intentional "crushing" of the sleeve as the pinion nut is tightened, and its' resistance to such.
9 inch Ford units which are using crush sleeves (not all do) do not have a measured torque value for tightening the pinion nut, but rather a tightening to a measured rotational resistance value to the pinion gear as mounted in the bearings (refer to manual). Under-torquing (which may be what one accomplishes if you - just put it back where it was as you marked it) will not locate pinion gear in bearings properly, allowing unwanted movement/motion in the relationship of the ring & pinion (read failure!). Over torquing will apply excessive preload to the bearings causing overheating (and failure!). This is one area where considerations for the intended use (street/moderate load vs racing/high load) and condition (new vs used) of the components at hand needs to be considered. Solid one piece spacers were available in.001" increments (within the intended range) and used in the "Daytona" supports from Ford (now all oblsolete), the so called solid spacers or "Stack-A-Shim" systems are unreliable (as witnessed), due to shims being turned, folded & torn in heavy (?) service, leading to failure. Also, note that the pinion nut, as an interference thread for retention is also "not to be reused" as per Ford.
I have attempted to only clarify certain points mentioned previously, so one is not led astray, and perhaps inject a few thoughts and cautions, but most important - STUDY THE MANUAL!
Any questions?
Scott.Last edited by pbf777; May 19, 2017, 06:41 PM.Comment
-
I totally agree that everyone should use their Shop Manual as their first resource. Section 8 in my 1959 Ford Shop Manual:

Is this the correct procedure? Ford says it is but we can get more technical for better results. When the yoke nut is properly tightened, an INCH/pound torque wrench should be used to test bearing 'drag' and it should read about 10-12 INCH/pounds of torque to move the pinion gear. What does that mean? A one-pound weight at the end of a (horizontal) 12-inch wrench should just start to move the yoke. OR, a two-pound weight at six inches (horizontal) should do the same. This should be the proper 'drag' for your pinion bearings.
I'm not in Brazil but even so, these instructions should be easy to follow anywhere in the world. - Dave
CLICK HERE to see my custom hydraulic roller 390 FE build.
"We've got to pause and ask ourselves: How much clean air do we need?"
--Lee Iacocca
From: Royal Oak, MichiganComment
-
This is why I stated, that rear differentials may be best left to those with experience on the subject. These units are well engineered and generally trouble free, but, if monkeyed with, a minor misstep can lead to a major failure.
I previously stated "Study your manual concerning this unit carefully", maybe I should have stated "thoroughly". Additional study of the work shop manual, perhaps in the area of the rebuilding of the differential (9" Ford specifically), one should acquire an understanding of the function and proper procedures for servicing it; at which point one may conclude that the answer to the first question is NOOOO!
All who have been extensively exposed to service/shop manuals has at some point realized that there may be some conflict or poor presentation as printed (although such may be justified in the eyes of the author). But, the manual is the first place to reference, particularly as an introduction on the subject. And, it is with experience, that one is able to discern that which may be less than ideal.
The reference to the rotational torque values ("drag") for proper bearing preload can only be accomplished with the pinion gear disengaged from the ring gear, aka bearing support assembly removed from the differential housing (5 bolts). And this value must be addressed any time the pinion nut is turned!
Also realize that we are dealing with vehicles that aren't exactly fresh and of low mileage, and the existing bearing preload value may be suffering (may be why the seal is leaking), so even if one successfully returns all components back to their original position (your timing marks would have to be of micrometer accuracy), will this prove correct?
Additional reading/study is well advised, so as to achieve a well guided and happy outcome.
Scott.Comment
-
I've had the pinion nut off various rear ends and successfully replaced then with no issues.
I mark the position of the nut and when tightening it I do so with the rear wheels on the ground and tighten the nut until the car start to move forwards and add some Wick-In Loctite.
So far it has worked for me.A Thunderbirder from the Land of the Long White Cloud.Comment
-
I have too, Tom. I've also re-used the nut with no problem. The Drivetrain Engineers who designed these rear ends also wrote the Shop Manuals. The product is great and so is the manual. Did I miss the part about not re-using the nut? Come to think of it, I've never seen one fail. - Dave
CLICK HERE to see my custom hydraulic roller 390 FE build.
"We've got to pause and ask ourselves: How much clean air do we need?"
--Lee Iacocca
From: Royal Oak, MichiganComment
-
I know how to read shop manuals, but i wanted to have some practical experiences, because they can be different from what is written in the manuals.
Since the Bird already has its age, i don�t know what has been done to it before, and i have some (to me more than normal) whine coming from the diff, i want to see the pinion and ring gear and check the pinion rotating torque before i remove the flange nut.sigpicFrank
1958 T-Bird "Trov�o Rosa" - "Rose Thunder"
Thunderbird registry #61670Comment


Comment