Announcement

Collapse
No announcement yet.

Stablizer Insulators

Collapse
X
 
  • Time
  • Show
Clear All
new posts
  • YellowRose
    Super-Experienced


    • Jan 21 2008
    • 17229

    #16
    Stablizer Insulators

    I have known Lance for quite a few years. You can get some very important and accurate information from him regarding sway bars in general, and his heavy duty ones. Dave is correct, as Lance does have Tbird owners from all over the place send their Birds to him for repairs or restoration.

    Ray Clark - Squarebirds Administrator
    The Terminator..... VTCI #11178 ITC #6000 Yellow Mustang Registry (YMR) #12188
    Contact me via Private Message for my email address, or Call (Cell) 210-875-1411

    https://www.squarebirds.org/picture_gallery/TechnicalResourceLibrary/trl.htm
    Faye's Ovarian Cancer Memorial Website.
    https://faye.rayclark.info/index.html

    Comment

    • Thunderherd
      Apprentice
      • Oct 22 2014
      • 46

      #17
      I called and talked to Lance today. Didn't order because he said his wife usually takes care of that, and she had some meetings she was at today. So I'm calling her back tomorrow to order. Had a nice conversation with Lance. He said front bar is 1 1/8 inches and the rear is 1 inch. He also stated these bars really flatten the curves out. Think he said he designed them, or had them designed, had a proto-type build, then put them on his Bird and tested them out on some North Carolina curves. Then immediately called his builder and had them put in production. Sounds good to me, and I'll probably be ordering more stuff from him. Sounds like a great guy.

      Comment

      • YellowRose
        Super-Experienced


        • Jan 21 2008
        • 17229

        #18
        Stablizer Insulators

        Great, Jimmy! I am glad you were able to hook up with Lance. He IS great people, and terrific to talk with. He know so much about these old Tbirds of ours. He has always been a great source of information for me on helping our membership troubleshoot problems on their Birds, when I do not know the answers to the questions. A good number of Tbird owners have changed out their OEM sway bars for the heavy duty ones and have seen great improvements in the handling of their Birds. It is kinda like switching from a generator to an alternator, or drum brakes to disc brakes. After making the switch, you will not want to go back...

        Ray Clark - Squarebirds Administrator
        The Terminator..... VTCI #11178 ITC #6000 Yellow Mustang Registry (YMR) #12188
        Contact me via Private Message for my email address, or Call (Cell) 210-875-1411

        https://www.squarebirds.org/picture_gallery/TechnicalResourceLibrary/trl.htm
        Faye's Ovarian Cancer Memorial Website.
        https://faye.rayclark.info/index.html

        Comment

        • Deanj
          Super-Experienced
          • Nov 26 2015
          • 631

          #19
          Stabilizer Insulators Installed

          It took 2 days and hours to install OEM insulators on a stock '60 T-Bird sway bar. I had to figure it out myself, but Dave and Lance Herrington did lend some technical background and moral support. Anyone who says this job is easy never did it. You'll be installing link kits, too.

          Purchase OEM bushings and 2 Moog link kits. You'll need a 1/2" ratchet, 3/8" torque wrench, 9/16 and 1/2" sockets for both, giant 20" pliers, box cutter, carpet blade, hammer, large screwdriver, and ramps. Oh yes, get a friend.

          1. Drive car on ramps because wheels have to be on the ground
          2. Remove both end links.
          3. Unbolt and remove bushing brackets.
          4. Cut old bushings and pry our with screwdriver.
          5. Clean sway bar and coat with lithium grease or similar.
          6. Slice new bushings at one side, preferably not the side facing the rear of the car.
          7. Place both over the sway bar and coat bushing outside with dawn.
          8. Place bracket in front cross member slot and push it over the bushing until seated.
          9. Have your friend grab the bracket with the giant pliers and rotate the bracket toward the rear of the car. *This brings the bracket hole in line with the frame hole so you can screw the bolt in. Leave these loose.
          10. Install both link kits, and torque to 15 ft.-lbs. only after both sides are installed, initially.
          11. Torque bushing bolts to 15 ft.-lbs.

          I know what you're thinking. Why didn't I get the sway bar upgrade in the first place. This was the job I was doing-and it was a bugger until I figured out how to rotate the bracket with a fat new bushing to get the holes to line up.

          Dean
          Last edited by Deanj; March 24, 2018, 08:31 AM. Reason: Re-thought hacksaw useage to carpet blade.

          Comment

          • simplyconnected
            Administrator
            • May 26 2009
            • 8787

            #20
            Dean, I called yesterday and discussed this task at length with you. I also encouraged you to call Lance Herrington because he stocks and installs front and rear stabilizer bars. Lance's bars are 1-1/8" diameter and a whole lot less forgiving than OEM bars to install but the procedure is the same.

            Let's talk about the guy on the assembly line. He installs one stabilizer bar per minute, every minute of every hour that line is rolling. Assemblies must be as easy as possible and all the parts must fit.

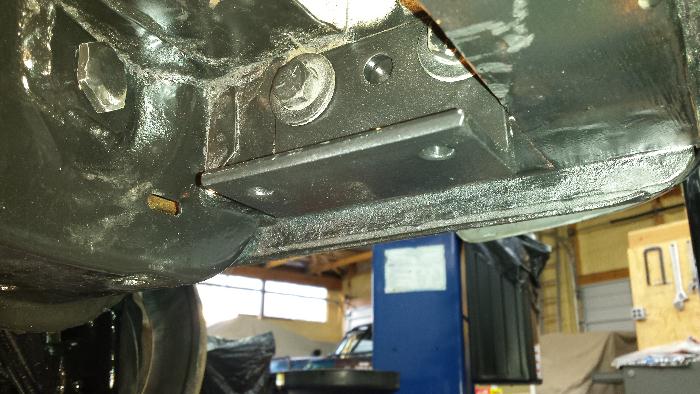
            There are tools that help. If you can't find the hole, use a drift. If your bolt is tough to find the threads, use what we call 'dog point' bolts with a blank lead on the tip like this body bolt:


            I'm not here to diminish your hard work but a sway bar is not hard to install. I've done many. You can lift the car if it gives you more room to work but the wheels do not need to be hanging or on the ground, they only need to be even with each other. That removes any torque on the bar for when the end links are serviced.

            I will not use a saw on bushings (as we discussed) because the material removed causes the dimension to change when the bushing is tightened. Instead, urethane bushings are sliced with a sharp blade with some pressure. Replacement bushings usually come with the slice already in them.

            It's nice to have a helper especially when handling the larger bars but I've done many alone. Simply wire up one end while you install the other. - Dave
            Member, Sons of the American Revolution

            CLICK HERE to see my custom hydraulic roller 390 FE build.

            "We've got to pause and ask ourselves: How much clean air do we need?"
            --Lee Iacocca

            From: Royal Oak, Michigan

            Comment

            • Deanj
              Super-Experienced
              • Nov 26 2015
              • 631

              #21
              I talked to you and Lance at length. If I hadn’t got this installed, I ‘d purchased the performance bar. Since I didn’t set out to do this, I maintained the current set-up.

              I cut the bushing rather than slipping it over the bar which requires a man and 2 boys. An intact bushing wouldn’t have made this easier. I still needed the giant pliers to horse the bracket and bushing into position.

              Everyone said this is easy. Right. Only after I discovered what needs to be done. I’m passing it on.

              Dean

              Comment

              • OX1
                Super-Experienced
                • Feb 10 2016
                • 557

                #22
                Best part about upgraded sway bars is the frame mount
                bracket. The original way is mounts, seems marginal
                for even the stock bar with rubber bushings.

                59-430-HT

                Comment

                • Thunderherd
                  Apprentice
                  • Oct 22 2014
                  • 46

                  #23
                  Time for an update. Sorry it took so long to get back, but as they say, the fit hit the shan. I ordered my sway bars late on Wed. afternoon just after my last post. To late for Lance to call his supplier that day, but he ordered them from his supplier the next morning. I had the bars on my porch Satauday afternoon. That's pretty darn fast. Started installing the front bar the next week. Probably only took a couple of hours to install the bar, but I did a couple of more things, like straightened my front bumper while I had things loose, painted a couple of things. Then got delayed for a while. Friend of mine shot his self. Brake line rusted/busted on my Jeep Cherokee and had to fix that, broke alternator mounting bolt my Dodge pickup and had to fix that, then got sick with broncitis for about 3 weeks. That really zapped me. Got back to the rear sway bar last week. Lot more involved than the front. Positioned the bar on the axle, marked and drilled holes in the frame for the brackets, then temporarily mounted everything for a test fit. Used the jack to run axle up and down to check clearances. Took bolts out of frame and welded a bushing in for them, greased thing up good and reinstalled. Set the car back on the ground Monday evening and took for a short drive(I've got a road right in front of me about 2 miles long that's curves the entire way). Then I drove it to a couple of cruise ins this weekend, again taking the curvey roads. For anybody that hasn't done this mod, it's just about as good as the disc brake mod. Before, the car really leaned in the curves. Just dipped really bad. After, this thing is practically flat going through the same curves, and at a signifinatly quicker pace. I've got an '05 Mustang that handles superbly, really hangs in there on the curves. Feels like a race car. This big ole T Bird can give it a run for the money now, it's that good. Thanks to all you guys on here for your advise. Oh, and I have to say Lance and his wife are some great people to deal with. I called Lance a couple of times and he was more than happy to offer his expertise on getting things going. And great to deal with.

                  Comment

                  • simplyconnected
                    Administrator
                    • May 26 2009
                    • 8787

                    #24
                    Originally posted by Thunderherd
                    ...For anybody that hasn't done this mod, it's just about as good as the disc brake mod. Before, the car really leaned in the curves. Just dipped really bad. After, this thing is practically flat going through the same curves, and at a signifinatly quicker pace...
                    Thanks for getting back with your story. Many times, we never hear back. You can tell from my prior posts that I like Lance Herrington, too.

                    If it took you a couple hours to install your front stabilizer bar, I can't understand why Deanj had a hard time installing his. Certainly, you guys got the same bar from the same guy. - Dave
                    Member, Sons of the American Revolution

                    CLICK HERE to see my custom hydraulic roller 390 FE build.

                    "We've got to pause and ask ourselves: How much clean air do we need?"
                    --Lee Iacocca

                    From: Royal Oak, Michigan

                    Comment

                    • StealthSRT10
                      Experienced
                      • Jun 7 2017
                      • 208

                      #25
                      Anyone have pictures or pricing for the rear sway bar / installed? would be interested in that. also the front it sounds like its a different setup than oem. My car leans like a motoGP bike around corners. even with new leafs and shocks and load assit on the leafs.
                      1959 Thunderbird 397ci
                      Cruise-O-Matic
                      Flamingo Pink.
                      Thunderbird Registry #8442
                      Daily driver

                      Comment

                      • YellowRose
                        Super-Experienced


                        • Jan 21 2008
                        • 17229

                        #26
                        Stablizer Insulators

                        Ryan, have you looked in the Technical Resource Library (TRL)? The information on sway bars, front and rear, is there. About everything you need to know on how to install them, except the price. I would suggest that you call Lance Harrington the owner of Tbirds Southwest and talk with him about them, and he can give you the price. 979-249-4200. In fact since you do not live to far from La Grange, I would encourage you to set up a meeting with him, make the drive, check out his business, and get to know someone who really knows his Tbird stuff. He is a great person to talk with! He repairs and restores Tbirds from all over the country and out of it, for that matter. You can go to the TRL, hit Ctrl F for Find, type in Sway Bars, and you will find a good number of links there regarding sway bars. Here is a link you want to look.

                        http://www.squarebirds.org/picture_g...stallSheet.pdf

                        Ray Clark - Squarebirds Administrator
                        The Terminator..... VTCI #11178 ITC #6000 Yellow Mustang Registry (YMR) #12188
                        Contact me via Private Message for my email address, or Call (Cell) 210-875-1411

                        https://www.squarebirds.org/picture_gallery/TechnicalResourceLibrary/trl.htm
                        Faye's Ovarian Cancer Memorial Website.
                        https://faye.rayclark.info/index.html

                        Comment

                        • StealthSRT10
                          Experienced
                          • Jun 7 2017
                          • 208

                          #27
                          perfect thanks so much. i always forget to check there for non oem things.
                          1959 Thunderbird 397ci
                          Cruise-O-Matic
                          Flamingo Pink.
                          Thunderbird Registry #8442
                          Daily driver

                          Comment

                          Working...
                          😀
                          🥰
                          🤢
                          😎
                          😡
                          👍
                          👎